Transit Route Änderung der Verkehrsmanagementmaßnahme

März 2022 – Technischer Hinweis #67

Tessa Haymann

Produktspezialist bei Aimsun

Eine neue Funktion, die mit Next 22 eingeführt wurde, ist die Verkehrsmanagementmaßnahme Transit Route Change (ÖV Route Change). In diesem technischen Hinweis wird erläutert, wie die Maßnahme umgesetzt wird und welche Möglichkeiten es gibt, sie zu nutzen.

Ab Version 22 ist der Standardname für den ÖV jetzt Transit, es sei denn, du änderst ihn in den Aimsun Next-Einstellungen auf Deutsch (Vereinigtes Königreich).

Mit der Maßnahme Transitroute ändern kannst du einen Teil der Route einer Transitlinie (ÖV-Linie) ändern. Da es sich um eine Verkehrsmanagementmaßnahme handelt, kann die Umleitung nur in einigen Szenarien oder während eines Teils des Simulationszeitraums aktiviert werden. Derzeit ist diese Maßnahme nur in Mikro- und Meso-Simulationen verfügbar, nicht aber in Hybrid-Simulationen.

Der häufigste Anwendungsfall ist die Erstellung einer Umleitungsroute für eine Transitlinie, wenn es auf der Standardroute zu Störungen kommt, z.B. bei einer Blockade durch einen Unfall oder durch Bauarbeiten. Aber wie wir am Ende dieses technischen Hinweises sehen werden, kann die Route auch in Kombination mit Geometriekonfigurationen geändert werden. Eine fortschrittlichere Anwendung über die API ist die Erstellung flexibler Routen für Busdienste.

Wie bei anderen Verkehrsmanagementmaßnahmen muss die Maßnahme zur Änderung der Transitroute entweder einer Verkehrsbedingung oder einer Strategie und Richtlinie hinzugefügt werden. Der Effekt ist derselbe, der Unterschied liegt lediglich im Konzept: Verwende eine Verkehrssituation, wenn du einen bestimmten Zustand darstellen willst, der sich der Kontrolle entzieht, während du eine Strategie und Verkehrsregel verwendest, wenn du einen Reaktionsplan darstellen willst, der von einem Verkehrsmanagementbetreiber aufgestellt wurde, um die Auswirkungen eines Ereignisses zu mildern.

So fügst du sie als Teil einer Verkehrssituation hinzu: Erstelle eine Verkehrssituation, indem du mit der rechten Maustaste im Verkehrsmanagementmenü auf Neu und dann auf Verkehrssituation klickst. Um die Maßnahme zu erstellen, klicke mit der rechten Maustaste auf die Verkehrssituation, klicke auf Neu und dann auf Transitroute ändern. Die Verkehrszustände müssen dann in der Registerkarte Strategien und Verkehrszustände dem Szenario hinzugefügt werden.

Abbildung 1: Verkehrsmanagementoptionen mit einer Maßnahme zur Änderung der Transitroute

To add it as part of a policy: create a strategy by right clicking in the traffic management menu, clicking new and then strategy. Then create a policy within that by right clicking on the strategy, clicking new and then policy. Finally, to create the action, right click on the policy, click new and then transit route change. The strategy must then be added to the scenario in the strategies and conditions tab and then the policy to the experiment in the policies tab.


To activate the action, it is also necessary to set up an activation condition in the traffic condition or in the policy. You have the following options:


  • Always – activate the action for the full modelled period
  • Time – activate the action for part of the modelled period
  • Trigger – activate the action according to network conditions and deactivate according to network conditions
  • External – activate the action via API

To set up the route change, double click on the route change action and select the transit line that you wish to detour from the drop-down box at the top. Its original route appears on the left part of the dialogue. To start select, the line that you wish to detour.

Abbildung 2: Transitroute ändert Konfiguration Dialog

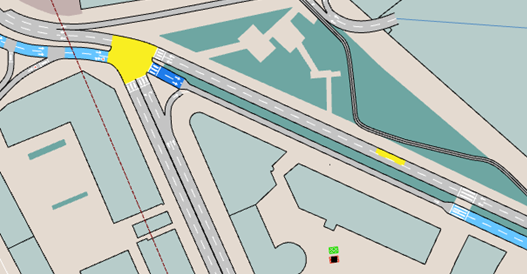
Gehe dann die Strecken in der Liste der „ursprünglichen Route“ durch. In der Ansicht siehst du, dass die ausgewählte Strecke dunkelblau hervorgehoben ist. Wenn du die letzte Strecke vor deinem geplanten Umweg erreichst, wählst du mit der oberen grünen Pfeiltaste die Strecke als Start für den Umweg aus.

Abbildung 3: Die dunkelblaue Strecke ist in der Benutzeroberfläche ausgewählt

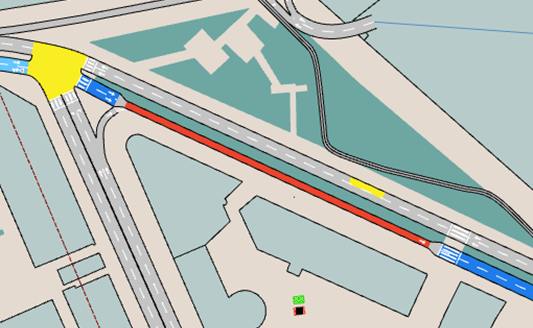
Im Feld „Alternative Route“ wählst du alle Strecken aus, die die Umleitung bilden. Diese werden in rot eingezeichnet. Vergiss nicht, alle Stoppschilder, die angefahren werden sollen, umzulegen. Nachdem du die Alternativroute fertiggestellt hast, wählst du im Feld „Originalroute“ die Strecke aus, auf der die Umleitung wieder in die normale Route einmündet, und ordnest sie mit dem unteren grünen Pfeil im Feld „Umleitung auf Strecke beenden“ zu.

Abbildung 4: Fenster zum Ändern der Route mit einer Umleitung
Abbildung 5: Transitroute mit Umleitung (in rot)

You may then wish to set the dwell times in the bottom box for any new stops on the detour.


You can use this action when creating scenarios with planned or unplanned events (e.g. roadworks or accidents) to create detours that allow transit vehicles to avoid a closed turn or section along their route; if you don’t, they will wait indefinitely for the closure to be cleared.


But there’s another use case, which is supported from version 22.0.1: coding changes of transit routes in conjunction with geometry configurations.


If you used geometry configurations, you are familiar with the need to fully recode all transit lines that go through the locations where the network geometry is altered. With the introduction of the transit route change action, you can recode just the portion of the line that goes through each area where the network geometry is changed.

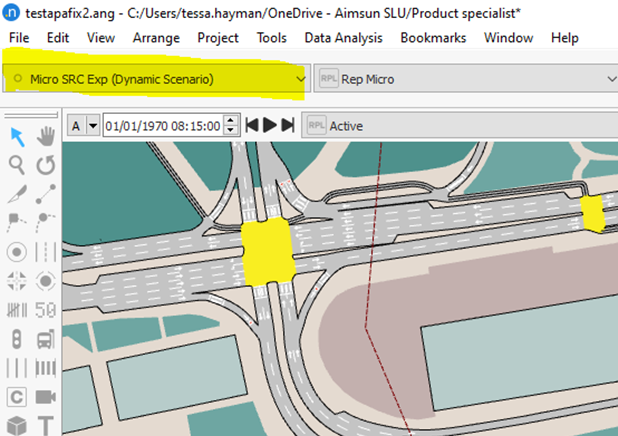
To do this, first change your view in the user interface to be the view for a scenario with the geometry configuration activated, by selecting it in the menu in the top left of the window.


For each geometry configuration active in the selected scenario, create a traffic condition. Set the activation of the traffic condition to always (including the warm-up).

Figure 6: Select the scenario

For each line that goes through a section removed by the geometry configuration, create a transit route change action in the corresponding traffic condition.


Then when selecting the detour in the route change object, set the last section before the geometry configuration to be the start of the detour. This can be easily identified as these sections will be followed by a grey section instead of a blue one.

Then code your detour through the geometry configuration by selecting the sections created by the geometry configuration.


Finally, select the section at the end of the detour, which is the first blue section preceded by a grey section.


Figure 7: Select the detour through the geometry configuration
Figure 8: Select the start of the detour

When you associate to a scenario a set of geometry configurations, just remember to activate at the same time the corresponding traffic conditions containing the detours for transit lines, and you are all set.

More technical notes

Aimsun vehicle paths

September 2014: Josep Perarnau erläutert die verschiedenen Ansätze zur Analyse von Fahrzeugpfaden.

Wie man in Aimsun Next Radfahrer modelliert

Juli 2020: In Aimsun Next können Sie nun auch nicht-spurgebundene Fahrzeuge wie Fahrräder zu Ihrem Modell hinzufügen. In diesem technischen Hinweis werden wir untersuchen, wie Sie in Ihrem Modell Radfahrer erstellen können, und einige mögliche Szenarien betrachten.

  • Hast du eine Frage? Nimm Kontakt auf.

    Wir sind hier um zu helfen!

  • Hast du eine Frage? Nimm Kontakt auf.

    Wir sind hier um zu helfen!

TEILEN

Zitieren Aimsun Next

Aimsun Next 23

Aimsun (2023). Aimsun Next 23 User’s Manual, Aimsun Next Version 23.0.0, Barcelona, Spanien. Zugriff am: July. 19, 2023. [Online].
Verfügbar: https://docs.aimsun.com/next/23.0.0/


Aimsun Next 20.0.5

Aimsun (2021). Aimsun Next 20.0.5 User’s Manual, Aimsun Next Version 20.0.3, Barcelona, Spanien. Accessed on: May. 1, 2021. [In software].
Available: qthelp://aimsun.com.aimsun.20.0/doc/UsersManual/Intro.html

Aimsun Next 23

@manual {​​​​​​​​AimsunManual,

title = {​​​​​​​​Aimsun Next 23 User’s Manual}​​​​​,
author = {​​​​​​​​Aimsun}​​​​​​​​,
edition = {​​​​​​​​​​​​​​​Aimsun Next 23.0.0}​​​​​​​​​​​​​​​,
address = {​​​​​​​​​​​​​​​Barcelona, Spain}​​​​​​​​​​​​​​​,
year = {​​​​​​​​​​​​​​​2023. [Online]}​​​​​​​​​​​​​​​,
month = {​​​​​​​​​​​​​​​Accessed on: Month, Day, Year}​​​​​​​​​​​​​​​,
url = {​​​​​​​​​​​​​​​https://docs.aimsun.com/next/23.0.0/}​​​​​​​​​​​​​​​,
}​​​​​​​​​​​​​​​


Aimsun Next 20.0.5

@manual {​​​​​​​​AimsunManual,

title = {​​​​​​​​Aimsun Next 20.0.5 User’s Manual}​​​​​​​​,
author = {​​​​​​​​Aimsun}​​​​​​​​,
edition = {​​​​​​​​​​​​​​​Aimsun Next 20.0.5}​​​​​​​​​​​​​​​,
address = {​​​​​​​​​​​​​​​Barcelona, Spain}​​​​​​​​​​​​​​​,
year = {​​​​​​​​​​​​​​​2021. [In software]}​​​​​​​​​​​​​​​,
month = {​​​​​​​​​​​​​​​Accessed on: Month, Day, Year}​​​​​​​​​​​​​​​,
url = {​​​​​​​​​​​​​​​qthelp://aimsun.com.aimsun.20.0/doc/UsersManual/Intro.html}​​​​​​​​​​​​​​​,
}​​​​​​​​​​​​​​​

Aimsun Next 23

TY – COMP
T1 – Aimsun Next 23 User’s Manual
A1 – Aimsun
ET – Aimsun Next Version 23.0.0
Y1 – 2023
Y2 – Accessed on: Month, Day, Year
CY – Barcelona, Spain
PB – Aimsun
UR – [In software]. Verfügbar: https://docs.aimsun.com/next/23.0.0/


Aimsun Next 20.0.5

TY – COMP
T1 – Aimsun Next 20.0.5 User’s Manual
A1 – Aimsun
ET – Aimsun Next Version 20.0.5
Y1 – 2021
Y2 – Accessed on: Month, Day, Year
CY – Barcelona, Spanien
PB – Aimsun
UR – [In software]. Available: qthelp://aimsun.com.aimsun.20.0/doc/UsersManual/Intro.html