Ausführen einer Simulation in Aimsun Next verbunden mit SCATSim

August 2022 – Technischer Hinweis #73

Dimitris Triantafyllos

Senior Product Specialist

SCATS ist ein intelligentes, adaptives Verkehrskontrollsystem, das in über 55.000 Kreuzungen in 187 Städten und 28 Ländern weltweit installiert ist und von der Organisation Road and Maritime Services (RMS) in NSW Australien entwickelt wurde. Das adaptive Verkehrsmanagementsystem SCATS synchronisiert Signalgruppen, um den Verkehrsfluss in einer ganzen Stadt, Region oder einem Korridor zu optimieren. Intelligente Algorithmen verarbeiten Echtzeitdaten, um die Signalgruppen an unerwartete Bedingungen anzupassen, Verkehrsmuster vorherzusagen und den Verkehr flüssig zu halten. Das Simulationsergebnis ist eine Verringerung der Staus, kürzere Fahrzeiten und eine erhöhte Sicherheit und Produktivität.

Der Betrieb des adaptiven Verkehrskontrollsystems SCATS kann in einer mesoskopischen oder mikroskopischen Simulation in Aimsun Next nachgebildet werden, indem eine Verbindung zu SCATSim hergestellt wird, einer Reihe von Softwaremodulen, die von RMS entwickelt wurden, um einen realen SCATS-Einsatz zu emulieren. Mit der SCATS-Schnittstelle arbeitet Aimsun Next als Server, um über Sockets (TCP/IP) mit einem oder mehreren lokalen Lichtsignalsteuergeräten zu kommunizieren, die von WinTraff (einem der Module von SCATSim) emuliert werden und als Clients fungieren. Aimsun Next liefert WinTraff jede Sekunde die Daten der Detektorauslösung und WinTraff antwortet mit den Zuständen der Signalgruppen, wobei zu Beginn der Simulation alle Signalgruppen rot sind. Bei mehreren Controllern (und damit mehreren WinTraff-Instanzen) erfolgt die Kommunikation über SimHub (ein weiteres Modul von SCATSim), das einen einzigen Kommunikationskanal mit der Simulation ermöglicht und sich um die Weiterleitung der ausgetauschten Daten von und zu der entsprechenden WinTraff-Instanz kümmert.

Um diesen Datenaustausch zu erreichen, ist es wichtig, dass Aimsun Next-Objekte wie Steuerungen, Signale, Detektoren mit den entsprechenden SCATS-Objekten übereinstimmen. Der Abgleich kann automatisch über die SCATS ITS-Schnittstelle oder manuell durch Öffnen der SCATS Access-Anwendung und Replizieren der gleichen Objekte und Identifikatoren in der Aimsun Next-Software erfolgen. In diesem Beispiel wird der zweite Ansatz hervorgehoben.

Beachte die folgenden wichtigen Anforderungen:

  • Eine Lizenz für beide Aimsun Next + Externe Signalsteuerung-Schnittstellen
  • Eine Lizenz für SCATSim (2 USB-Dongles: 1 für SCATS Central Manager und 1 für SCATS Region)
  • Zugang zur SCATS-Datenbank und zu den Daten der SCATS-Regionen.
  • Anwendungen: SCATS Central Manager, SCATS Central Manager Konfiguration, SCATS Region, SCATS Region Konfiguration, SCATS Access, SimHub, WinTraff
  • The Exe application
  • SCATSim funktioniert nur unter Windows OS

Vor der Verbindung von SCATSim mit der Aimsun Next-Simulation müssen mehrere Softwareanwendungen eingerichtet werden. Folgen Sie den schrittweisen Anweisungen zur Vorbereitung der Anwendungen SCATS Central Manager, SCATS Region, SimHub und WinTraff:

Eine Kurzanleitung zur Einrichtung von SCATS Central Manager

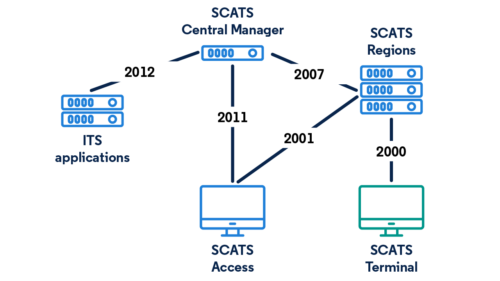
Hinweis: Für diese Kurzanleitung haben wir Informationen aus dem Benutzerhandbuch SCATS Central Manager Configuration.pdf und dem Benutzerhandbuch SCATS Central Manager.pdf verwendet. Der folgende Graph zeigt die Konfiguration der verschiedenen benötigten Server und die Standard-Ports, über die sie miteinander kommunizieren, um die SCATS ITS Benutzeroberfläche im SCATS Terminal auszuführen.

Note: For this quick guide, we used information from SCATS Central Manager Configuration user manual.pdf andSCATS Central Manager user manual.pdf. In the graph below, it is displayed the configuration of all different servers required and the default ports that each one communicates with the other to run the SCATS ITS Interface in the SCATS Terminal.
1.      Required Data

To setup the SCATS Central Manager you need the following data:


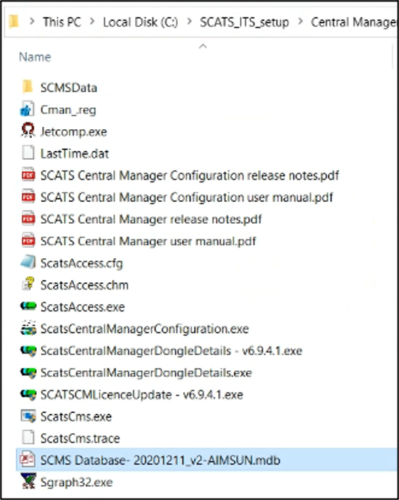
1. SCATS Central Manager folder

The SCATS Central Manager folder contains the following folders/files:
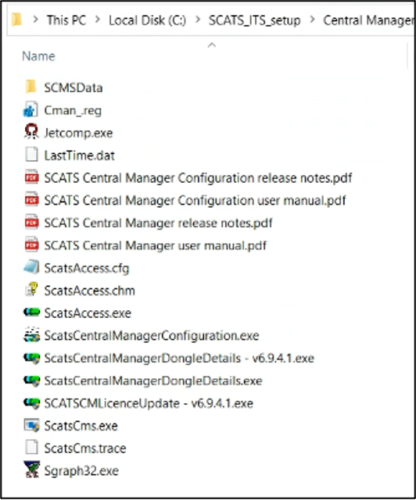
You can request this software from Transport for New South Wales or the local SCATS distributor.


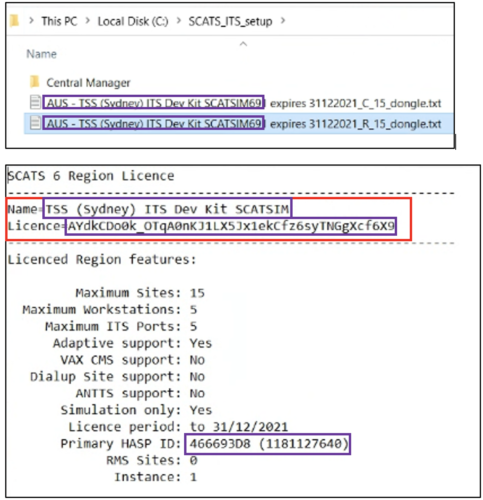
2. SCATS Central Manager License file

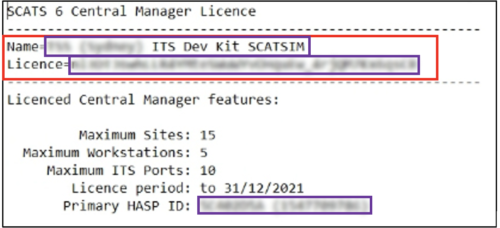
The SCATS Central Manager License file (.txt). The “Name” and the “License” information will be used later to set up the SCATS Central Manager.

You can request this data from Transport for New South Wales or the local SCATS distributor.


3. SCATS Database

The SCATS Database file should be preferably in “.mdb” format. If database type is “.sql”, then you must install SQL Express software to read the database. For more information, see the SCATS Central Manager user manual. The database should be placed inside the Central Manager folder:
 

4. SCATS Region folder

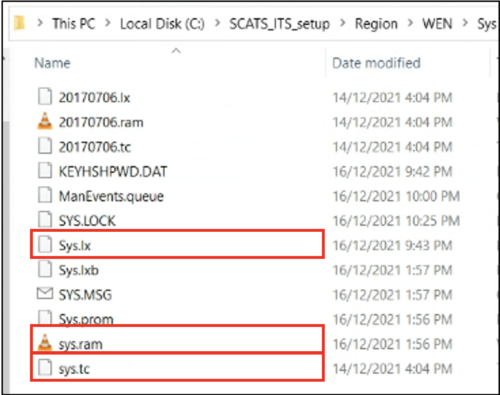
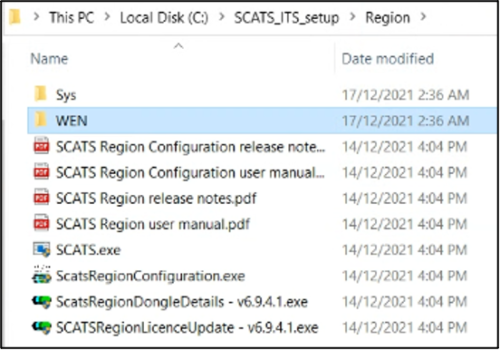
The SCATS Region folder usually includes a folder per region with the .tc, .lx, .ram, .hist and .vs files for each region. The SCATS Region folder may also include more files such as manuals and executable applications.  

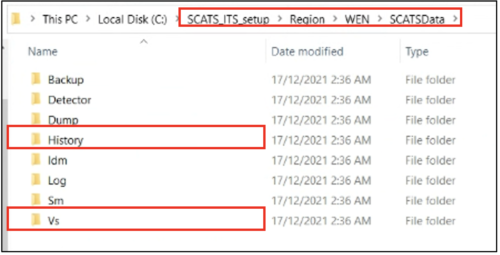
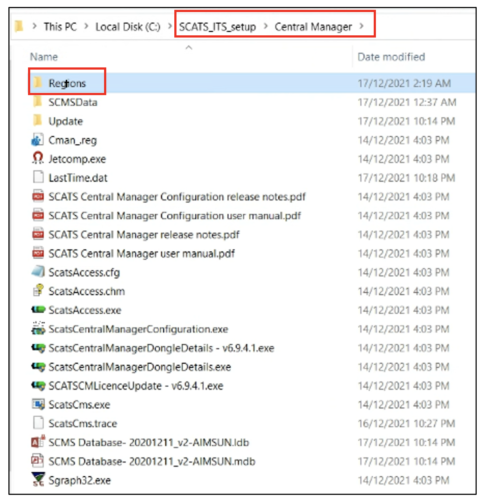
At this point we need to clarify that the folder i.e.: SCATS_ITS_Setup \ Region is required to connect Aimsun Next with SCATSim. The folder SCATS_ITS_Setup\Central Manager\ Region is required to connect Aimsun Next with SCATS ITS. 

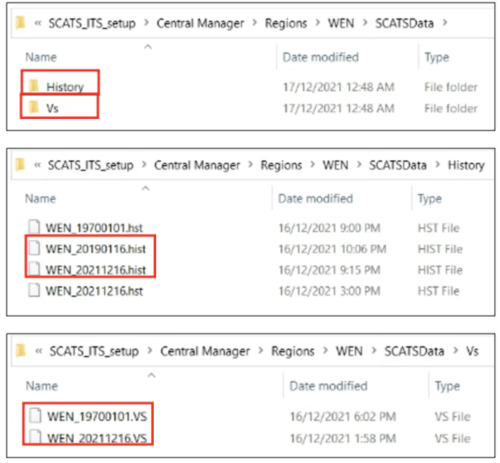
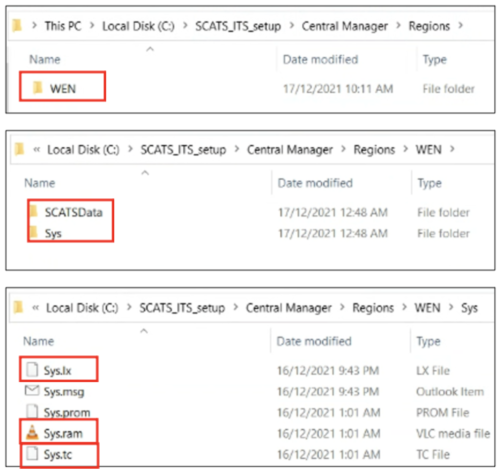
The .tc, .lx and .ram files per region are required to connect Aimsun Next with the SCATSim application. The .hist and .vs files per region are required for SCATS ITS if users would like to import historical signal timings and historical count measurements. 

See an example of the SCATS Region folder below: 
The Region folder should be also copied under the SCATS Central Manager folder; however the folder structure is different. The folder structure required is displayed in the screenshot below:
 

2.     Running the ODBC 32-bit application

To let the SCATS applications connect to the SCATS database we must create an ODBC data source with the 32-bit ODBC Administrator in %windir%\SysWOW64\odbcad32.exe.

1. Run the exe

2. Go to the Tab “System DSN” -> “Add…” ->

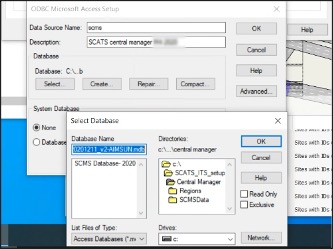
3. Add “Data Source Name” and “Description”. Then, press “Select…” -> go to the directory of the .mdb file and select that file. Then, select OK in all the opened windows.
 

3.     Configuring the SCATS Central Manager

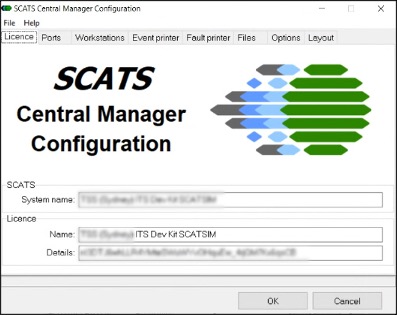
1. Double-click on the Central Manager/ScatsCentralManagerConfiguration.exe to access the SCATS Central Manager configuration window. Verify that the “SCATS System Name”, the “License Name” and “License Details” are consistent with the info in the SCATS Central Manager License file (.txt).
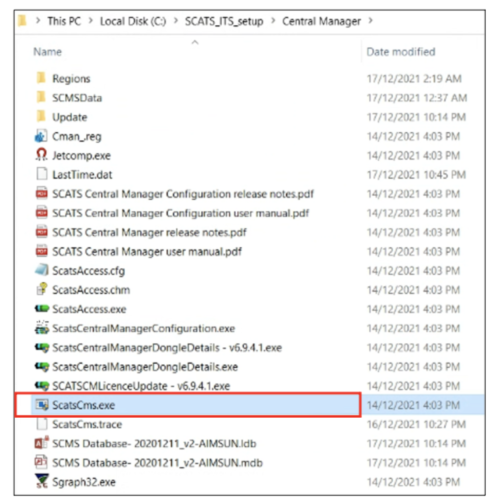
2. Launch the SCATS Central Manager application by double-clicking on Central Manager/ScatsCms.exe:
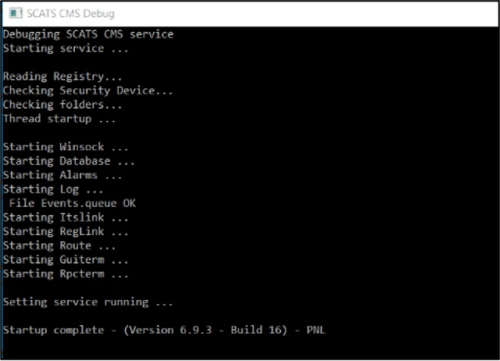
3. Once launched, a command line window named “SCATS CMS Debug” will open. After waiting for a couple of minutes, the following messages should be displayed “Setting service running…” – “Startup complete”:
Note: For this quick guide, we used information from SCATS Region Configuration user manual.pdf and SCATS Region user manual.pdf. In the graph below, it is displayed the configuration of all different servers required and the default ports that each one communicates with the other to run the SCATS ITS Interface in the SCATS Terminal.

1.      Required Data

To setup the SCATS Region you need the following data: 

1. SCATS Region License file

The SCATS Region License file (.txt). The “Name” and the “License” information will be used later to set up the Region application.

You can request this data from Transport for New South Wales or the local SCATS distributor

2. Configuring the SCATS Regions

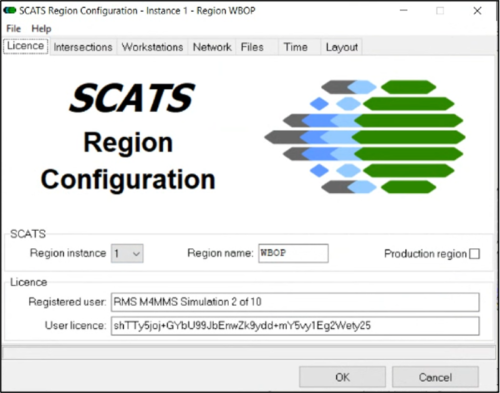
1. Define an ID for each SCATS Region. In general, the ID can be custom, it can be defined manually by the user, starting with ID=1 for i.e.: Region WBOP and then summing up +1 for the next Region. However, it is essential to confirm this process by asking the Traffic Road Authorities. In some cases they may provide you with the ID for each SCATS Region.

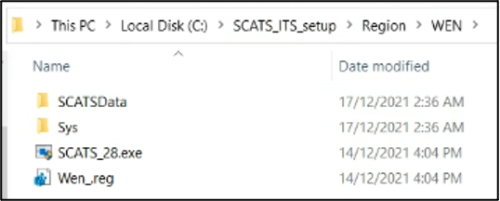
2. Access the Region folder and copy-paste the SCATS.exe file inside the region folder /Region/REGIONNAME/.

3. Modify the name of the SCATS.exe based on the logic: SCATS_ID.exe (i.e.: SCATS_28.exe)

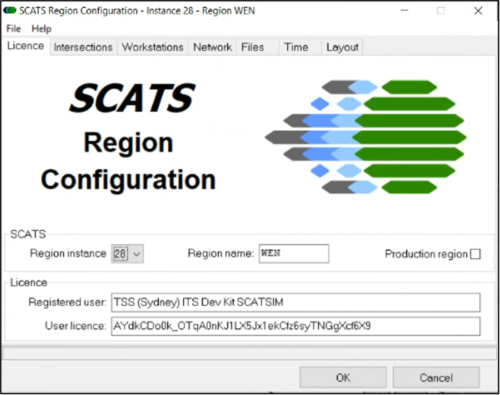
4. Double click on the /Region/ScatsRegionConfiguration.exe to access the SCATS Region configuration window.

5. Set the first or any other ID (i.e. 28) in the “SCATS Region instance” and set the corresponding “SCATS Region name” (i.e.: for ID=28, the name is WEN)

6. Verify that the “License” -> “Registered user” and “User license” fields are consistent with the SCATS Region License file (.txt) defined in the 1. Required data chapter. In some cases you may receive one license file for every SCATS region.

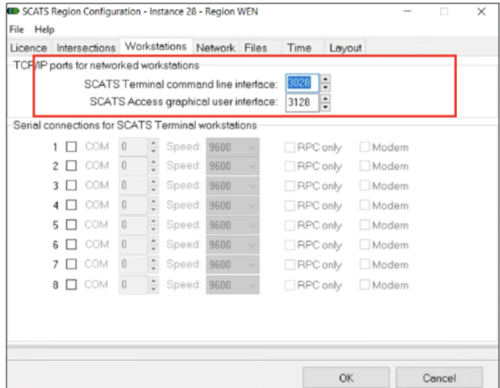
7. Then, select the Tab “Workstations” in the dialog of the SCATS Region configuration.

8. In “TCP/IP ports for networked workstations – SCATS Terminal command line interface” set a unique ID. We recommend to use the logic:  


NUMBER+SCATSRegionID i.e.: 3028. 

In “TCP/IP ports for networked workstations – SCATS Access graphical user interface” set a unique ID. We recommend using the logic:  

NUMBER+1+SCATSRegionID = 3128. 

See an example below, where NUMBER = 30


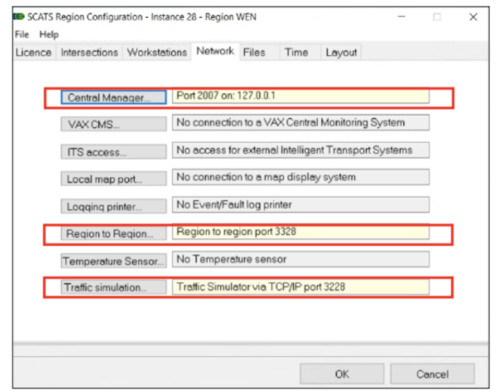
9. Then, select the Tab “Network”.

10. Apply the settings as indicated in the screenshot below to enable connections to: 

  • “Central Manager…”: Port 2007 on: 127.0.0.1 
  • “Region to Region”: Region to region port 3328  (NUMBER+3+SCATSRegionID = 3328) 
  • “Traffic simulation”: Traffic Simulator via TCP/IP port 3228 (NUMBER+2+SCATSRegionID = 3228)

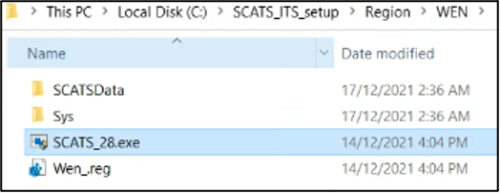
11. To launch the SCATS Region application for this Region, double click on Region/REGION_NAME/SCATS_ID.exe  application:

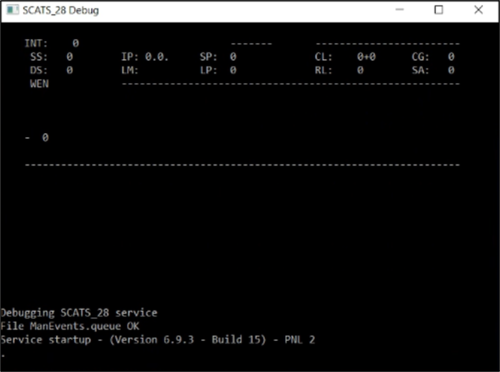
12. Then, a command line window is expected to open printing the following messages displayed in the following screenshot:

13. Repeat steps 1-12 for each Region.

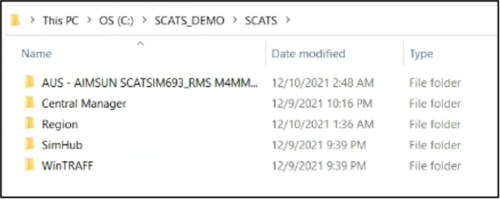
1. Copy-paste the SimHub folder in the same directory as the Central Manager and Region folders.

2. SimHub folder includes an application that you can launch by double-clicking on the SimHub.exe: 

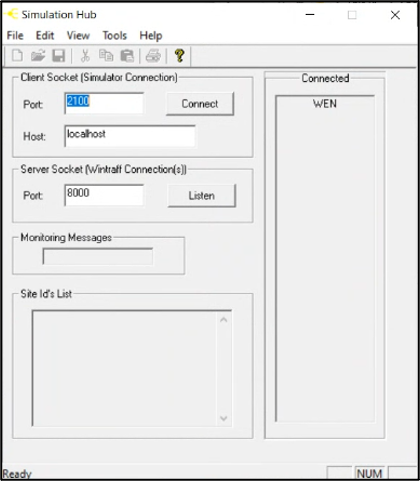
3. Once the application is launched, by default, the option “Client Socket” > Port should set to 2100, the “Client Socket” > Host to localhost and the “Server Socket Port” to 8000. If all settings are applied correctly, then on the right side, a list with all Regions connected to SimHub should be displayed (i.e.: WEN). 

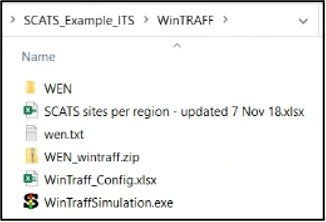
1. WinTraff folder should include the Region folders (i.e.: WEN) and the application “WinTraffSimulation.exe”. This data is provided by the Road Traffic Authorities.

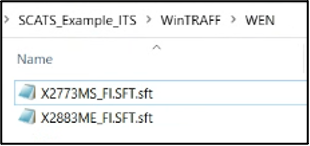
2. Inside each region folder (i.e.: WEN) are stored .sft files for each SCATS Site of that region.   

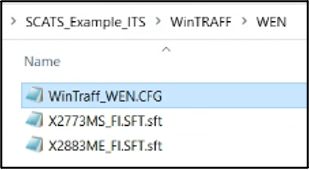
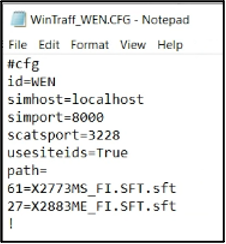
3. In this directory, if the configuration file is not provided, the user should create and define the configuration file named as WinTraff_REGIONNAME.CFG (WinTraff_WEN.CFG)

4. This file must include the following info: 

Where:

#cfg 

id = REGIONNAME 

simhost = localhost (as defined in SimHub) 

simport = 8000 (as defined in SimHub)  

scatsport = 3228 (as defined in the SCATS region Configuration.exe > Network > Traffic Simulation > TCP/IP) 

usesiteids = True (to use the site IDs as identifiers) 

path = 

61 = X2773MS_FI.SFT.sft (.sft file for SCATS Site ID: 2773) 

27 = X2883ME_FI.SFT.sft (.sft file for SCATS Site ID: 2883) 

! 


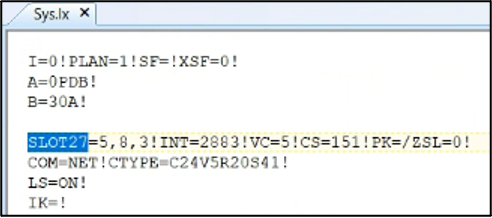
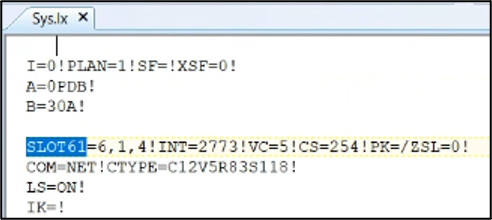
Note that 61 and 27 numbers refer to the SLOT ids with respect to the SCATS Sites 2773 and 2883 that belong to this Region. These SLOT ids can be found inside the Region folder in Region/REGIONNAME/Sys/Sys.lx.  

Important: To enable the SCATS emulation in Aimsun Next only for few SCATS Sites, then in the WinTraff configuration file you can set only the desired SCATS Sites. 

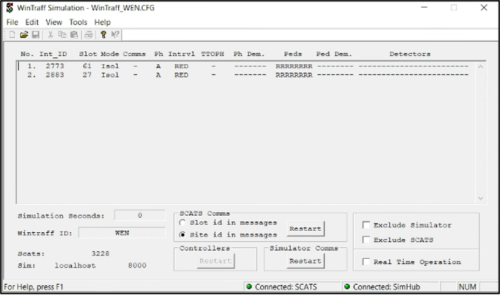
5. Double-click in the /WinTRAFF/WinTraffSimulation.exe application.

6. Select File -> Open.

7. Select the configuration file (.CFG) with the SCATS Sites of your interest (i.e.: 2773, 2883). 

Vorbereiten der Aimsun Next Netzwerkobjekte

Damit Aimsun Next und SCATSim verstehen, auf welche Melder und Signalgruppen sie sich bei der Kommunikation während der Simulation beziehen, müssen Sie für Steuergeräte, Signalgruppen und Melder einen gemeinsamen Bezeichner definieren.

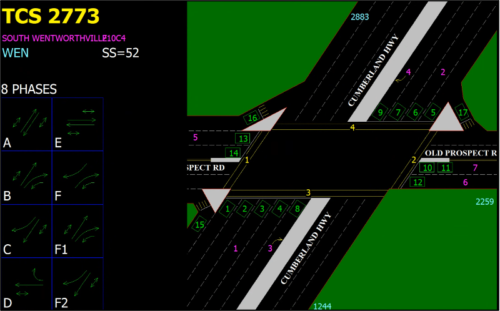
Öffnen Sie zunächst die SCATS Access Software, um die erforderlichen Informationen für diese SCATS Site ID:2773 zu erhalten.

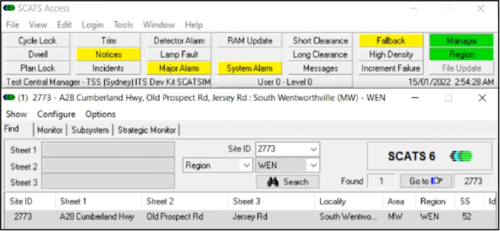
  1. Doppelklicken Sie auf die Datei /Central Manager/SCATSAccess.exe und warten Sie, bis das folgende Fenster erscheint:

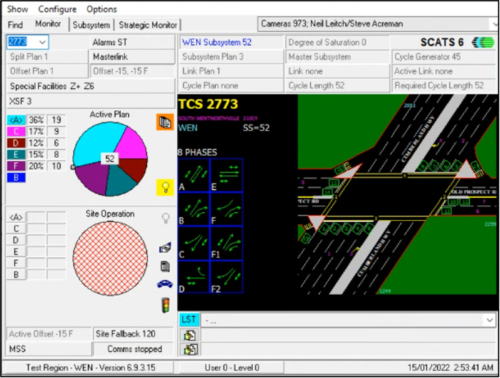
2. Geben Sie im Feld Standort-ID die gewünschte SCATS-Standort-ID ein (z. B. 2773), um die Geometrie, Signalgruppen, Phasen und Detektoren anzuzeigen.

Zusammenfassung:

  • SCATS-Standort-ID: 2773
  • 8 PHASES: A;B;C;D;E;F;F1;F2
  • 17 DETEKTIEREN

Then, open the Aimsun Next document to set up the required settings for the SCATS Site ID: 2773.

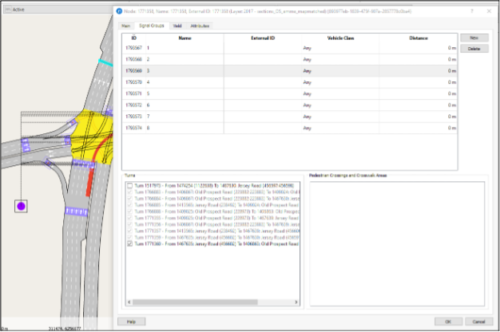
  1. Jede Signalgruppe in Aimsun Next sollte so definiert werden, wie sie in der SCATS-Datenbank mit denselben Abzweigungen verknüpft ist. Sie können SCATS Access verwenden, um zu prüfen, welche Abbiegungen von jeder Signalgruppe gesteuert werden, und diese manuell in Aimsun Next einstellen.

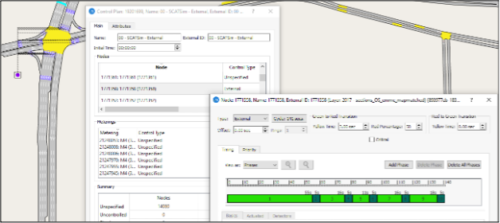
2. Für jeden Knoten in Aimsun Next, der von SCATSim gesteuert wird, muss der Kontrollplan auf Extern gesetzt werden. Für den Fall, dass die Verbindung zu SCATSim ausfällt, kann ein zeitlich festgelegter Kontrollplan erstellt werden, der verwendet wird.

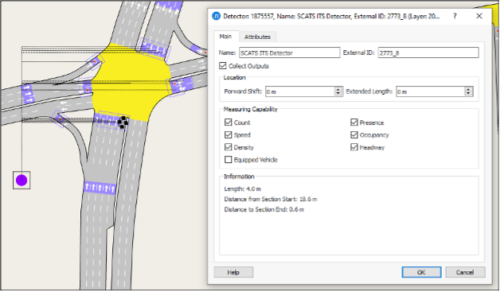
3. Jeder Detektor in Aimsun Next sollte wie in der SCATS-Datenbank positioniert, benannt und definiert sein. Die Mindestmessfähigkeiten des Melders, die erforderlich sind, um aktiviert zu werden, hängen von der Funktion des Melders ab. Bei den SCATS-Detektoren wird zwischen physischen (Messung von „Anzahl“ und „Belegung“) und logischen (Baken: Identifizierung von Fahrzeugen des öffentlichen Verkehrs) unterschieden. Logische Melder müssen zusätzlich zu „Zählung“ und „Belegung“ die Messfunktion „Ausgerüstetes Fahrzeug“ aktiviert haben. Sie sind immer mit einer Reihe von öffentlichen Verkehrslinien verbunden. Beachten Sie, dass die Messung der Detektorbelegung stark mit der Detektorlänge zusammenhängt. Daher sollte die Länge des Aimsun Next-Detektors der Länge des SCATS-Detektors entsprechen.

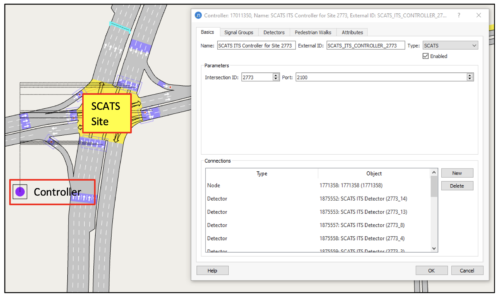
4. Erstellen Sie ein neues Aimsun-Controller-Objekt. Jeder SCATS-Standort solltee represented in Aimsun Next as one SCATS type Aimsun controller object.

5. In der Registerkarte *Basics* des Controller-Objekts:

    • Das Controller-Objekt muss mit dem Node-Objekt verbunden sein. Jeder SCATS-Standort kann jedoch als ein oder mehrere Aimsun-Knoten dargestellt werden. In diesem Fall müssen beide Knoten mit demselben Controller-Objekt verbunden sein.
    • SCATS-Melder müssen an das Steuerungsobjekt angeschlossen werden.
    • Das Kontrollkästchen „Aktiviert“ muss markiert sein. Die Kreuzungs-ID muss gleich der SCATS-Standort-ID und der Port muss gleich dem Simulationsverbindungsport in SimHub gesetzt werden.

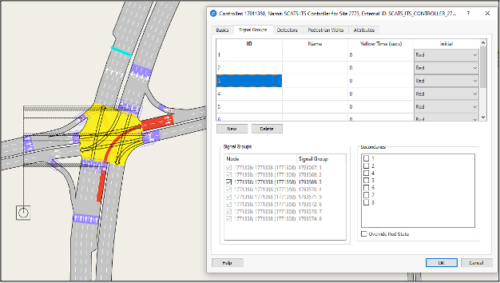
6. In der Registerkarte Signalgruppe des Controller-Objekts:

    • Weisen Sie die Signalgruppen zu und stellen Sie die ID so ein, dass sie mit der SCATS-Stufen-ID übereinstimmt.

7. Auf der Registerkarte Detektoren des Objekts Steuerung:

    • Fügen Sie alle Detektoren hinzu und legen Sie für jeden die ID fest, um ihn der SCATS-Detektor-ID zuzuordnen.

8. Machen Sie dasselbe für die restlichen SCATS-Standorte im Aimsun Next Netzwerk.

9. Danach können Sie eine Aimsun Next-Simulation (Micro, Meso oder Hybrid) starten und die Verkehrssignallogik des SCATS-Steuergeräts im Aimsun Next-Netzwerk emulieren.

Wichtig: Um sicherzustellen, dass Aimsun Next und SCATS-Anwendungen im Gleichschritt bleiben, werden bei jedem Simulationsschritt Synchronisations-Token zwischen ihnen übergeben. SCATS assumes a data transfer is made every second so every 1 second detector data should be available. Daher sollte der Detektorzyklus im dynamischen Szenario >Outputs to Generate auf 1 Sekunde gesetzt werden.

Für detailliertere Informationen öffnen Sie das Kapitel Aimsun Next User Manual – SCATS Interface.

Weitere technische Hinweise

Ausführen einer Simulation in Aimsun Next verbunden mit SCATSim

Dimitris Triantafyllos zeigt Ihnen, wie Sie eine Simulation in Aimsun Next durchführen, die mit SCATSim verbunden ist. Intelligente Algorithmen verarbeiten Echtzeitdaten, um die Zeitsteuerung von Verkehrssignalen anzupassen, die auf unerwartete Bedingungen reagieren, Verkehrsmuster vorhersagen und den Verkehr flüssig halten. Das Simulationsergebnis ist eine Verringerung der Staus, kürzere Fahrzeiten und eine erhöhte Sicherheit und Produktivität.

  • Hast du eine Frage? Nimm Kontakt auf.

    Wir sind hier um zu helfen!

  • Hast du eine Frage? Nimm Kontakt auf.

    Wir sind hier um zu helfen!

TEILEN

Zitieren Aimsun Next

Aimsun Next 23

Aimsun (2023). Aimsun Next 23 User's Manual, Aimsun Next Version 23.0.0, Barcelona, Spanien. Zugriff am: July. 19, 2023. [Online].
Verfügbar: https://docs.aimsun.com/next/23.0.0/


Aimsun Next 20.0.5

Aimsun (2021). Aimsun Next 20.0.5 User's Manual, Aimsun Next Version 20.0.3, Barcelona, Spanien. Accessed on: May. 1, 2021. [In software].
Available: qthelp://aimsun.com.aimsun.20.0/doc/UsersManual/Intro.html

Aimsun Next 23

@manual {​​​​​​​​AimsunManual,

title = {​​​​​​​​Aimsun Next 23 User's Manual}​​​​​,
author = {​​​​​​​​Aimsun}​​​​​​​​,
edition = {​​​​​​​​​​​​​​​Aimsun Next 23.0.0}​​​​​​​​​​​​​​​,
address = {​​​​​​​​​​​​​​​Barcelona, Spain}​​​​​​​​​​​​​​​,
year = {​​​​​​​​​​​​​​​2023. [Online]}​​​​​​​​​​​​​​​,
month = {​​​​​​​​​​​​​​​Accessed on: Month, Day, Year}​​​​​​​​​​​​​​​,
url = {​​​​​​​​​​​​​​​https://docs.aimsun.com/next/23.0.0/}​​​​​​​​​​​​​​​,
}​​​​​​​​​​​​​​​


Aimsun Next 20.0.5

@manual {​​​​​​​​AimsunManual,

title = {​​​​​​​​Aimsun Next 20.0.5 User's Manual}​​​​​​​​,
author = {​​​​​​​​Aimsun}​​​​​​​​,
edition = {​​​​​​​​​​​​​​​Aimsun Next 20.0.5}​​​​​​​​​​​​​​​,
address = {​​​​​​​​​​​​​​​Barcelona, Spain}​​​​​​​​​​​​​​​,
year = {​​​​​​​​​​​​​​​2021. [In software]}​​​​​​​​​​​​​​​,
month = {​​​​​​​​​​​​​​​Accessed on: Month, Day, Year}​​​​​​​​​​​​​​​,
url = {​​​​​​​​​​​​​​​qthelp://aimsun.com.aimsun.20.0/doc/UsersManual/Intro.html}​​​​​​​​​​​​​​​,
}​​​​​​​​​​​​​​​

Aimsun Next 23

TY - COMP
T1 - Aimsun Next 23 User's Manual
A1 - Aimsun
ET - Aimsun Next Version 23.0.0
Y1 - 2023
Y2 - Accessed on: Month, Day, Year
CY - Barcelona, Spain
PB - Aimsun
UR - [In software]. Verfügbar: https://docs.aimsun.com/next/23.0.0/


Aimsun Next 20.0.5

TY - COMP
T1 - Aimsun Next 20.0.5 User's Manual
A1 - Aimsun
ET - Aimsun Next Version 20.0.5
Y1 - 2021
Y2 - Accessed on: Month, Day, Year
CY - Barcelona, Spanien
PB - Aimsun
UR - [In software]. Available: qthelp://aimsun.com.aimsun.20.0/doc/UsersManual/Intro.html