Ejecutando una simulación en Aimsun Next conectado a SCATSim

Agosto de 2022 – Nota técnica #73

Dimitris Triantafyllos

Senior Product Specialist

SCATS es un sistema inteligente y adaptativo de control del tráfico instalado en más de 55.000 cruces en 187 ciudades y 28 países de todo el mundo. Desarrollado por Road and Maritime Services en Nueva Gales del Sur (Australia), el sistema de gestión adaptativa del tráfico SCATS sincroniza los semáforos para optimizar el flujo de tráfico en toda una ciudad, región o corredor. Los algoritmos inteligentes procesan los datos en tiempo real para adaptar los tiempos de las señales de tráfico que responden a condiciones inesperadas, predecir los patrones de tráfico y mantener el tráfico en movimiento. El resultado es una menor congestión, una menor duración de los trayectos y un aumento de la seguridad y la productividad.

El funcionamiento del sistema de control de tráfico adaptativo SCATS puede ser reproducido en una simulación mesoscópica o microscópica en Aimsun Next conectándose a SCATSim. SCATSim es un conjunto de módulos de software desarrollados por RMS para emular un despliegue real de SCATS. Con la Interfaz SCATS, Aimsun Next funciona como servidor para comunicarse vía sockets (TCP/IP) con uno o múltiples controladores de señales de tráfico locales, emulados por WinTraff (un módulo de SCATSim), que actúan como clientes.

Aimsun Next proporciona a WinTraff los datos de actuación del detector cada segundo y WinTraff responde con los estados de los grupos de señales, con todos los grupos de señales en rojo al principio de la simulación. Si hay varios controladores (y, por tanto, varias instancias de WinTraff) la comunicación se dirige a través de SimHub (otro módulo de SCATSim), que permite un único canal de comunicación con la simulación y se encarga de dirigir los datos intercambiados hacia y desde la instancia de WinTraff correspondiente.

Para lograr este intercambio de datos, es esencial que los objetos Aimsun Next, como los controladores, las señales o los detectores coincidan con los objetos SCATS correspondientes. El emparejamiento puede hacerse de forma automática, utilizando la interfaz SCATS ITS , o de forma manual, abriendo la aplicación SCATS Access y replicando los mismos objetos e identificadores en el software Aimsun Next. En este ejemplo, se destaca el segundo enfoque.

Ten en cuenta los siguientes requisitos importantes:

  • Una licencia para Aimsun Next AND para interfaces de control adaptativo
  • Una licencia para SCATSim (2 dongles USB: 1 para SCATS Central Manager y 1 para SCATS Region)
  • Acceso a la base de datos SCATS y a los datos de la región SCATS
  • Aplicaciones: SCATS Central Manager, SCATS Central Manager Configuration, SCATS Region, SCATS Region Configuration, SCATS Access, SimHub, WinTraff
  • La aplicación exe
  • SCATSim sólo funciona en el sistema operativo Windows

Es necesario configurar varias aplicaciones de software antes de conectar SCATSim a la simulación Aimsun Next. Siga las instrucciones paso a paso para preparar las aplicaciones SCATS Central Manager, SCATS Region, SimHub, WinTraff:

Una guía rápida para configurar el SCATS Central Manager

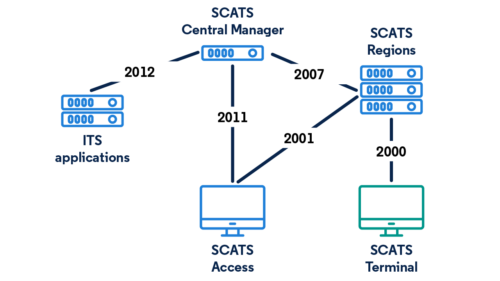
Nota: Para esta guía rápida, hemos utilizado la información del manual de usuario SCATS Central Manager Configuration.pdf y del manual de usuario SCATS Central Manager.pdf. En el siguiente gráfico, se muestra la configuración de los diferentes servidores necesarios y los puertos por defecto con los que se comunica cada uno para ejecutar la Interfaz SCATS ITS en el Terminal SCATS.

Note: For this quick guide, we used information from SCATS Central Manager Configuration user manual.pdf andSCATS Central Manager user manual.pdf. In the graph below, it is displayed the configuration of all different servers required and the default ports that each one communicates with the other to run the SCATS ITS Interface in the SCATS Terminal.
1.      Required Data

To setup the SCATS Central Manager you need the following data:


1. SCATS Central Manager folder

The SCATS Central Manager folder contains the following folders/files:
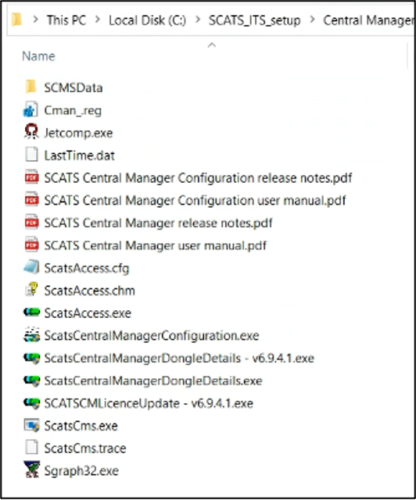
You can request this software from Transport for New South Wales or the local SCATS distributor.


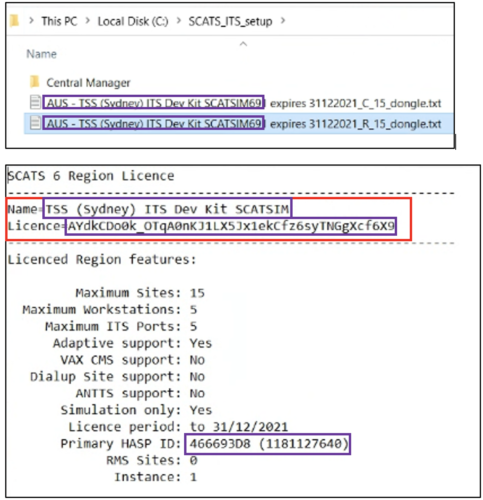
2. SCATS Central Manager License file

The SCATS Central Manager License file (.txt). The “Name” and the “License” information will be used later to set up the SCATS Central Manager.

You can request this data from Transport for New South Wales or the local SCATS distributor.


3. SCATS Database

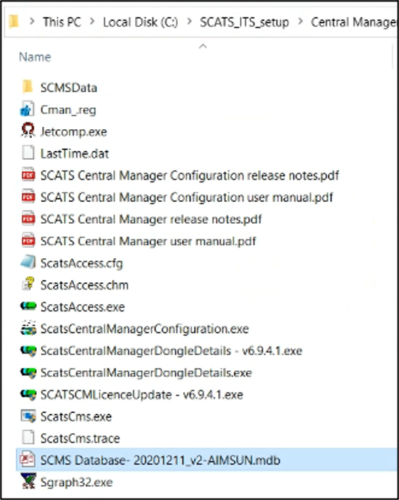
The SCATS Database file should be preferably in “.mdb” format. If database type is “.sql”, then you must install SQL Express software to read the database. For more information, see the SCATS Central Manager user manual. The database should be placed inside the Central Manager folder:
 

4. SCATS Region folder

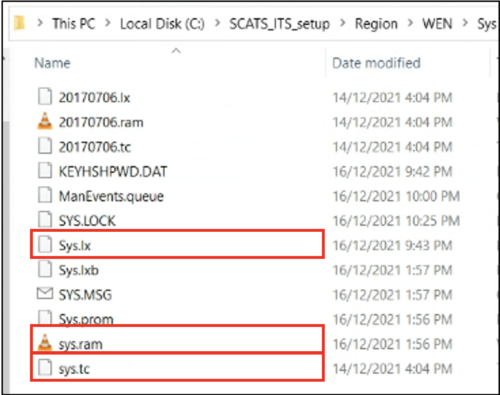
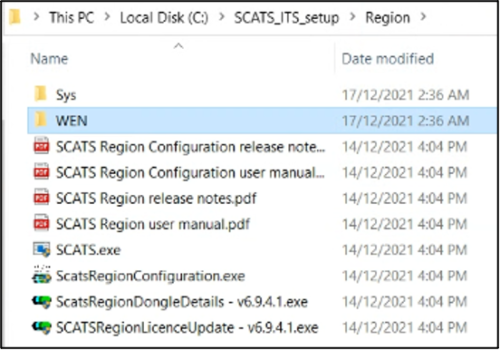
The SCATS Region folder usually includes a folder per region with the .tc, .lx, .ram, .hist and .vs files for each region. The SCATS Region folder may also include more files such as manuals and executable applications.  

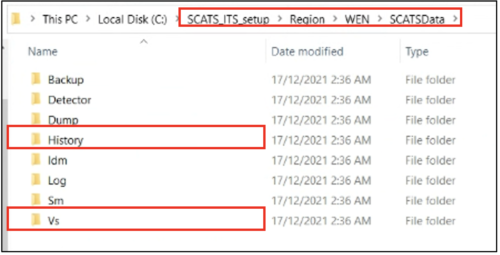
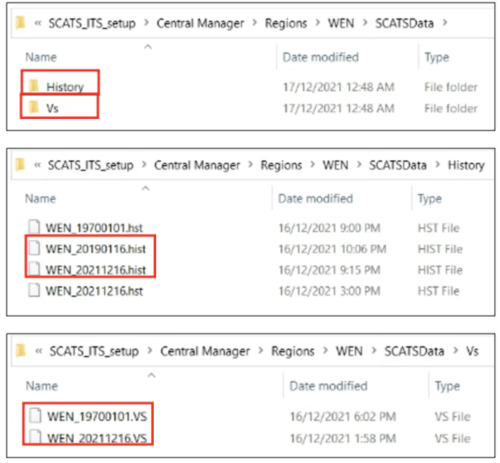
At this point we need to clarify that the folder i.e.: SCATS_ITS_Setup \ Region is required to connect Aimsun Next with SCATSim. The folder SCATS_ITS_Setup\Central Manager\ Region is required to connect Aimsun Next with SCATS ITS. 

The .tc, .lx and .ram files per region are required to connect Aimsun Next with the SCATSim application. The .hist and .vs files per region are required for SCATS ITS if users would like to import historical signal timings and historical count measurements. 

See an example of the SCATS Region folder below: 
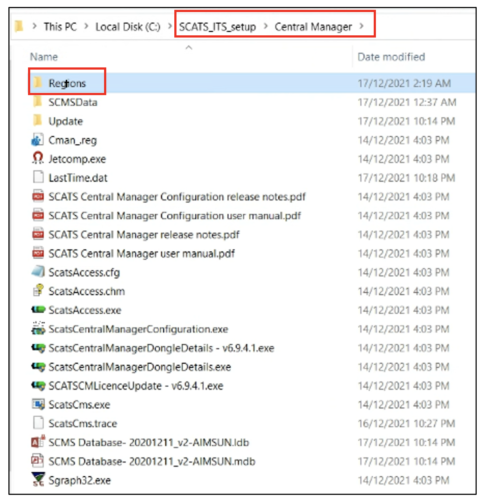
The Region folder should be also copied under the SCATS Central Manager folder; however the folder structure is different. The folder structure required is displayed in the screenshot below:
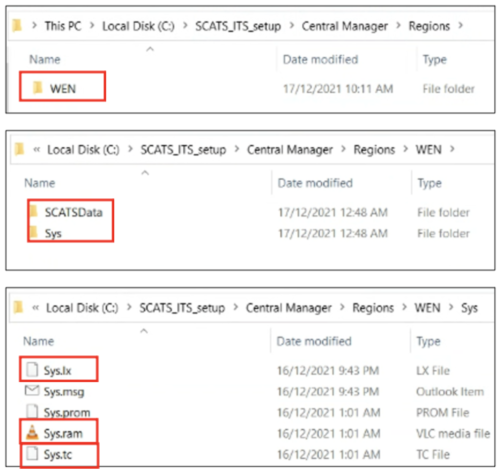
 

2.     Running the ODBC 32-bit application

To let the SCATS applications connect to the SCATS database we must create an ODBC data source with the 32-bit ODBC Administrator in %windir%\SysWOW64\odbcad32.exe.

1. Run the exe

2. Go to the Tab “System DSN” -> “Add…” ->

3. Add “Data Source Name” and “Description”. Then, press “Select…” -> go to the directory of the .mdb file and select that file. Then, select OK in all the opened windows.
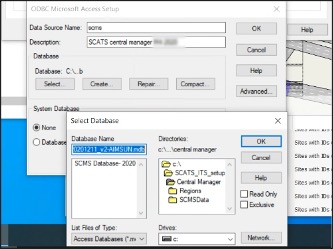
 

3.     Configuring the SCATS Central Manager

1. Double-click on the Central Manager/ScatsCentralManagerConfiguration.exe to access the SCATS Central Manager configuration window. Verify that the “SCATS System Name”, the “License Name” and “License Details” are consistent with the info in the SCATS Central Manager License file (.txt).
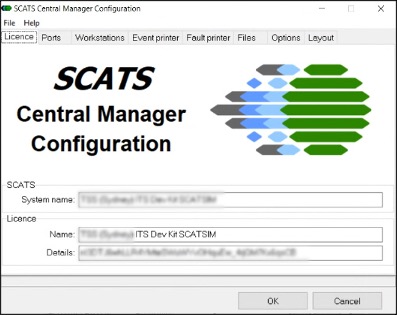
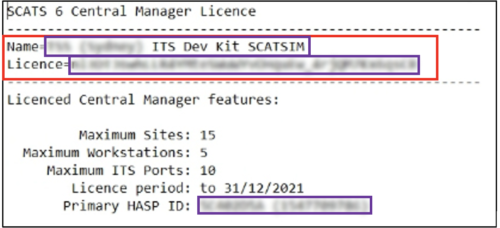
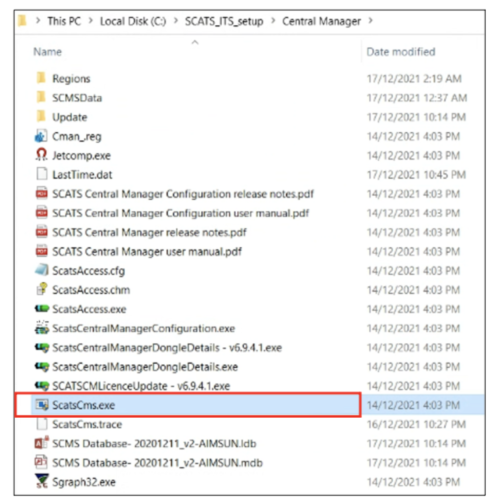
2. Launch the SCATS Central Manager application by double-clicking on Central Manager/ScatsCms.exe:
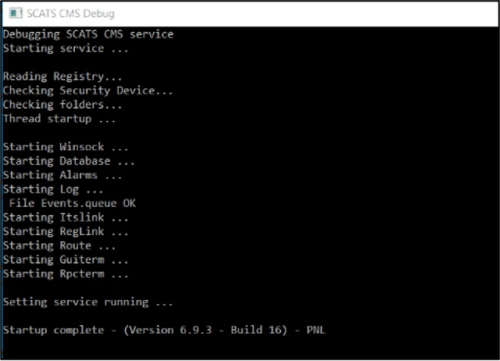
3. Once launched, a command line window named “SCATS CMS Debug” will open. After waiting for a couple of minutes, the following messages should be displayed “Setting service running…” – “Startup complete”:
Note: For this quick guide, we used information from SCATS Region Configuration user manual.pdf and SCATS Region user manual.pdf. In the graph below, it is displayed the configuration of all different servers required and the default ports that each one communicates with the other to run the SCATS ITS Interface in the SCATS Terminal.

1.      Required Data

To setup the SCATS Region you need the following data: 

1. SCATS Region License file

The SCATS Region License file (.txt). The “Name” and the “License” information will be used later to set up the Region application.

You can request this data from Transport for New South Wales or the local SCATS distributor

2. Configuring the SCATS Regions

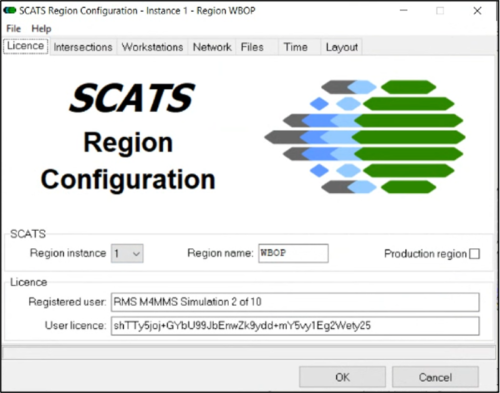
1. Define an ID for each SCATS Region. In general, the ID can be custom, it can be defined manually by the user, starting with ID=1 for i.e.: Region WBOP and then summing up +1 for the next Region. However, it is essential to confirm this process by asking the Traffic Road Authorities. In some cases they may provide you with the ID for each SCATS Region.

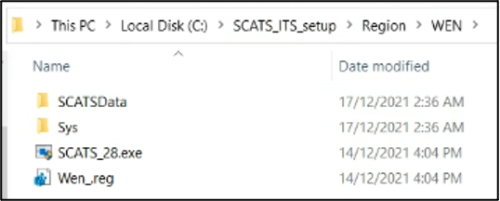
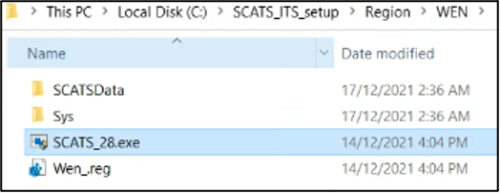
2. Access the Region folder and copy-paste the SCATS.exe file inside the region folder /Region/REGIONNAME/.

3. Modify the name of the SCATS.exe based on the logic: SCATS_ID.exe (i.e.: SCATS_28.exe)

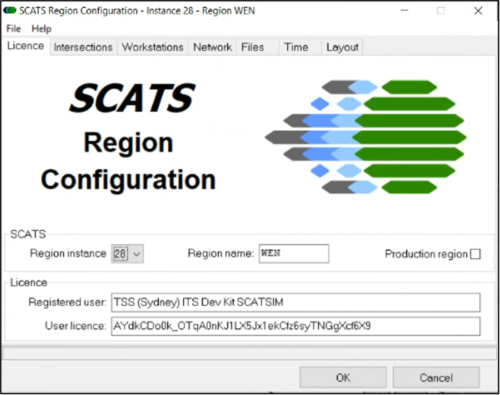
4. Double click on the /Region/ScatsRegionConfiguration.exe to access the SCATS Region configuration window.

5. Set the first or any other ID (i.e. 28) in the “SCATS Region instance” and set the corresponding “SCATS Region name” (i.e.: for ID=28, the name is WEN)

6. Verify that the “License” -> “Registered user” and “User license” fields are consistent with the SCATS Region License file (.txt) defined in the 1. Required data chapter. In some cases you may receive one license file for every SCATS region.

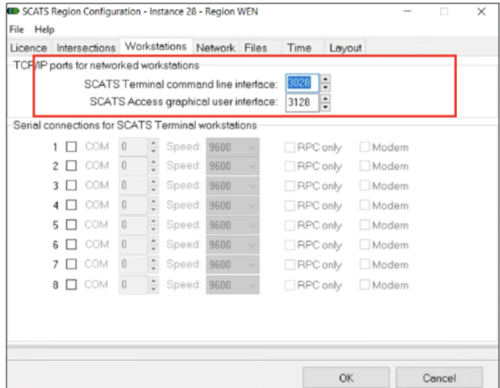
7. Then, select the Tab “Workstations” in the dialog of the SCATS Region configuration.

8. In “TCP/IP ports for networked workstations – SCATS Terminal command line interface” set a unique ID. We recommend to use the logic:  


NUMBER+SCATSRegionID i.e.: 3028. 

In “TCP/IP ports for networked workstations – SCATS Access graphical user interface” set a unique ID. We recommend using the logic:  

NUMBER+1+SCATSRegionID = 3128. 

See an example below, where NUMBER = 30


9. Then, select the Tab “Network”.

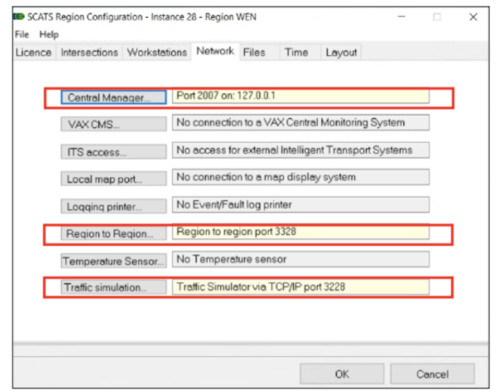
10. Apply the settings as indicated in the screenshot below to enable connections to: 

  • “Central Manager…”: Port 2007 on: 127.0.0.1 
  • “Region to Region”: Region to region port 3328  (NUMBER+3+SCATSRegionID = 3328) 
  • “Traffic simulation”: Traffic Simulator via TCP/IP port 3228 (NUMBER+2+SCATSRegionID = 3228)

11. To launch the SCATS Region application for this Region, double click on Region/REGION_NAME/SCATS_ID.exe  application:

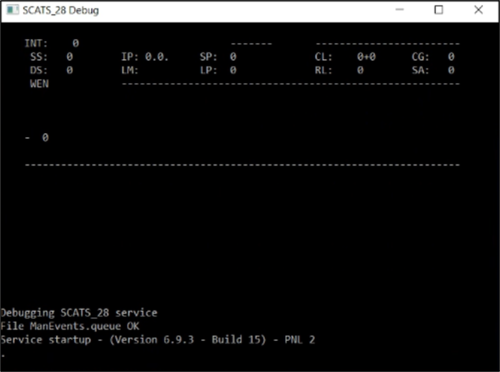
12. Then, a command line window is expected to open printing the following messages displayed in the following screenshot:

13. Repeat steps 1-12 for each Region.

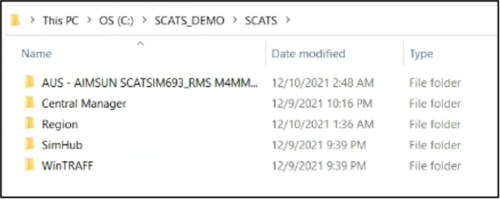
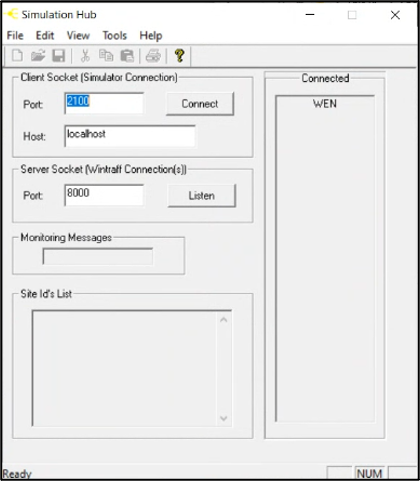
1. Copy-paste the SimHub folder in the same directory as the Central Manager and Region folders.

2. SimHub folder includes an application that you can launch by double-clicking on the SimHub.exe: 

3. Once the application is launched, by default, the option “Client Socket” > Port should set to 2100, the “Client Socket” > Host to localhost and the “Server Socket Port” to 8000. If all settings are applied correctly, then on the right side, a list with all Regions connected to SimHub should be displayed (i.e.: WEN). 

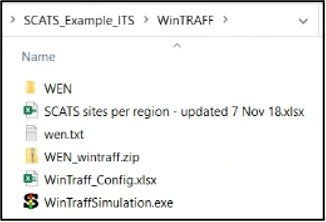
1. WinTraff folder should include the Region folders (i.e.: WEN) and the application “WinTraffSimulation.exe”. This data is provided by the Road Traffic Authorities.

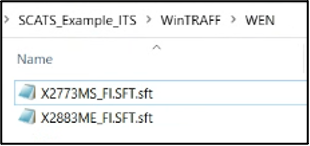
2. Inside each region folder (i.e.: WEN) are stored .sft files for each SCATS Site of that region.   

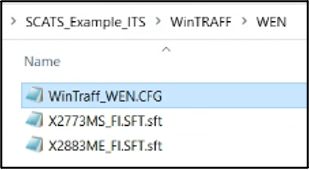
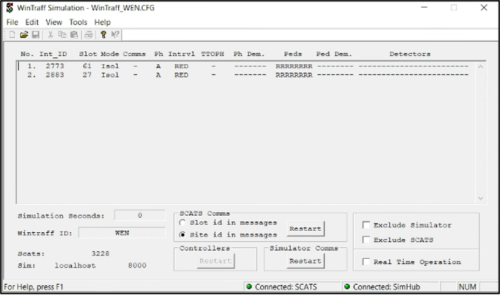
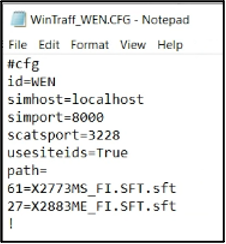
3. In this directory, if the configuration file is not provided, the user should create and define the configuration file named as WinTraff_REGIONNAME.CFG (WinTraff_WEN.CFG)

4. This file must include the following info: 

Where:

#cfg 

id = REGIONNAME 

simhost = localhost (as defined in SimHub) 

simport = 8000 (as defined in SimHub)  

scatsport = 3228 (as defined in the SCATS region Configuration.exe > Network > Traffic Simulation > TCP/IP) 

usesiteids = True (to use the site IDs as identifiers) 

path = 

61 = X2773MS_FI.SFT.sft (.sft file for SCATS Site ID: 2773) 

27 = X2883ME_FI.SFT.sft (.sft file for SCATS Site ID: 2883) 

! 


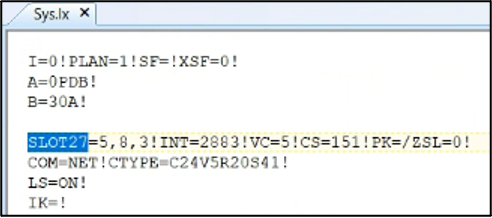
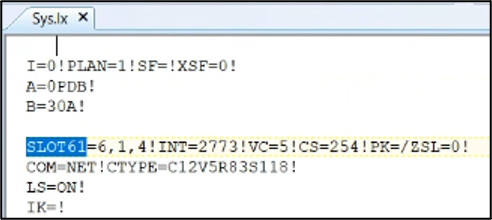
Note that 61 and 27 numbers refer to the SLOT ids with respect to the SCATS Sites 2773 and 2883 that belong to this Region. These SLOT ids can be found inside the Region folder in Region/REGIONNAME/Sys/Sys.lx.  

Important: To enable the SCATS emulation in Aimsun Next only for few SCATS Sites, then in the WinTraff configuration file you can set only the desired SCATS Sites. 

5. Double-click in the /WinTRAFF/WinTraffSimulation.exe application.

6. Select File -> Open.

7. Select the configuration file (.CFG) with the SCATS Sites of your interest (i.e.: 2773, 2883). 

Preparación de los objetos de la red Aimsun Next

Para que Aimsun Next y SCATSim entiendan a qué detectores y grupos de señales se refieren en la comunicación durante la simulación, hay que definir para los controladores, grupos de señales y detectores un identificador común.

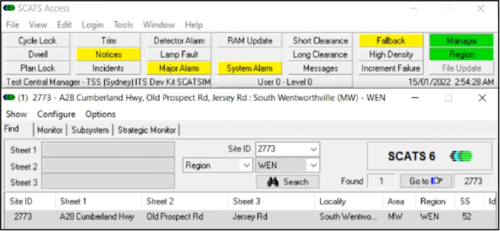
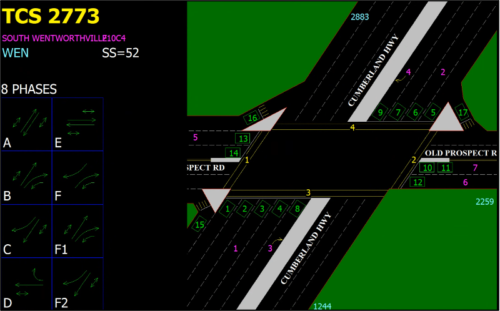
Primero, abra el software SCATS Access para obtener la información requerida para este SCATS Site ID:2773.

  1. Haga doble clic en /Central Manager/SCATSAccess.exe y espere a ver la ventana que aparece a continuación:

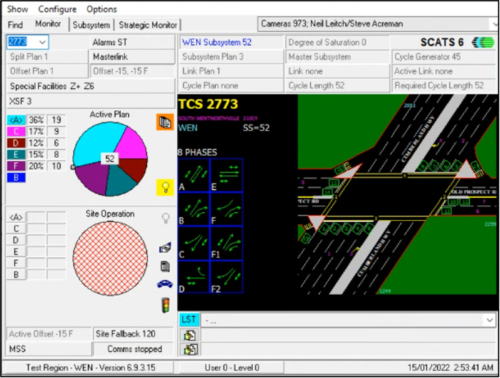
2. In the Site ID field set the desired SCATS Site ID (i.e.: 2773) to visualize its geometry, signal groups, phases and detectors.

Resumen:

  • SCATS Site ID: 2773
  • 8 FASES: A;B;C;D;E;F;F1;F2
  • 17 DETECTORES

Luego, abra el documento Aimsun Next para establecer las configuraciones requeridas para el SCATS Site ID: 2773.

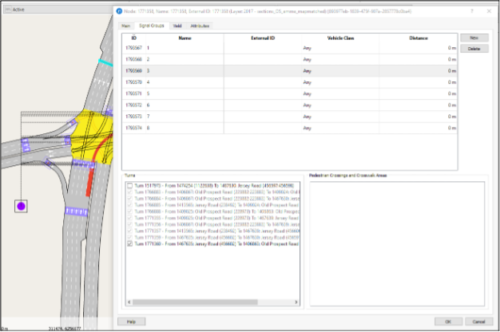
  1. Cada grupo de señales en Aimsun Next debe definirse tal y como está en la base de datos SCATS con los mismos turnos asociados. Puedes utilizar SCATS Access para comprobar qué giros están controlados por cada grupo de señales y configurar manualmente los mismos en Aimsun Next.

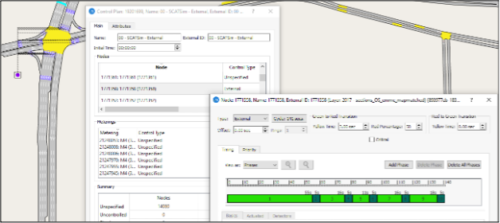
2. Para cada nodo en Aimsun Next controlado por el SCATSim, el plan de control debe ser establecido como Externo. Se puede proporcionar un plan de control preestablecido para que se utilice en caso de que falle la conexión con SCATSim.

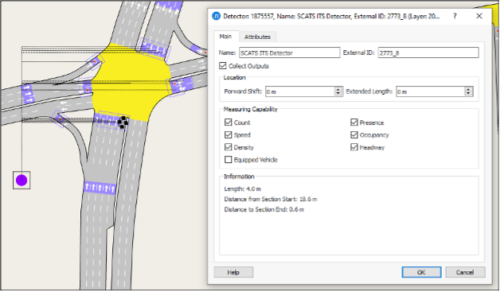
3. Cada detector en Aimsun Next debe ser posicionado, nombrado y definido como en la base de datos SCATS. La capacidad mínima de medición del detector requerida para ser activado depende de la función del detector. Los detectores SCATS se diferencian en físicos (miden el “recuento” y la “ocupación”) y lógicos (balizas: identifican los vehículos de transporte público). Los detectores lógicos deben haber activado la capacidad de medición “Vehículo equipado” además del “recuento” y la “ocupación”. Siempre están asociadas a un conjunto de líneas de transporte público. Tenga en cuenta que las mediciones de ocupación del detector están fuertemente relacionadas con la longitud del mismo. Por lo tanto, la longitud del detector Aimsun Next debe corresponder a la longitud del detector SCATS.

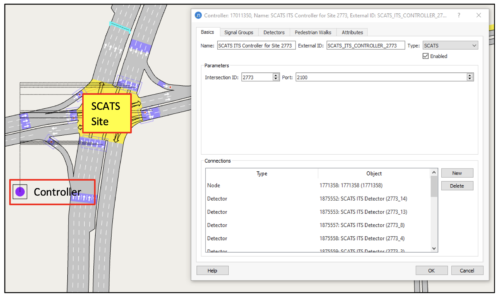
4. Crea un nuevo objeto controlador Aimsun. Cada Sitio SCATS debe ser representado en Aimsun Next como un objeto controlador Aimsun tipo SCATS.

5. En la pestaña *Basics* del objeto controlador:

    • El objeto controlador debe estar conectado al objeto nodo. Sin embargo, cada Sitio SCATS puede ser representado como uno o más nodos Aimsun. En ese caso, ambos nodos deben estar conectados al mismo objeto controladorC.
    • Los detectores SCATS deben estar conectados al objeto controlador.
    • La casilla “Activado” debe estar marcada. El ID de la intersección debe ser igual al ID del sitio SCATS y el puerto debe ser igual al puerto de conexión de la simulación en SimHub.

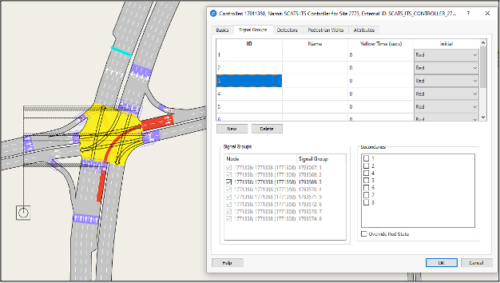
6. En la pestaña Grupo de señales del objeto Controlador:

    • Asigne los Grupos de Señales y establezca el ID para mapear aquellos con el ID de la etapa SCATS.

7. En la pestaña Detectores del objeto Controlador:

    • Add all detectors and for each one set the ID to map it to the SCATS Detector ID.

8. Haga lo mismo para el resto de los sitios SCATS de la red Aimsun Next.

9. Una vez hecho esto, usted está listo para lanzar una simulación Aimsun Next (Micro, Meso o Híbrido) y emular la lógica de la señal de tráfico del controlador SCATS en la red Aimsun Next.

Importante: Para asegurar que las aplicaciones Aimsun Next y SCATS permanezcan en paso, los tokens de sincronización son pasados entre ellos en cada paso de la simulación. SCATS asume que se realiza una transferencia de datos cada segundo, por lo que cada 1 segundo deberían estar disponibles los datos del detector. Por lo tanto, el ciclo del detector en el Escenario Dinámico e>Outputs to Generate debe establecerse en 1 segundo.

Para obtener información más detallada, abra el Manual del usuario de Aimsun Next – capítulo de la interfaz SCATS.

More technical notes

  • ¿Tienes alguna pregunta? Ponte en contacto.

    ¡Estamos aquí para ayudarte!

  • ¿Tienes alguna pregunta? Ponte en contacto.

    ¡Estamos aquí para ayudarte!

SHARE

Citar Aimsun Next

Aimsun Next 23

Aimsun (2023). Aimsun Next 23 Manual del usuario, Aimsun Next Versión 23.0.0, Barcelona, España. Acceso: 19, 2023. [Online].
Disponible en: https://docs.aimsun.com/next/23.0.0/


Aimsun Next 20.0.5

Aimsun (2021). Aimsun Next 20.0.5 Manual del usuario, Aimsun Next Versión 20.0.3, Barcelona, España. Acceso: May. 1, 2021. [En software].
Disponible: qthelp://aimsun.com.aimsun.20.0/doc/UsersManual/Intro.html

Aimsun Next 23

@manual {​​​​​​​​AimsunManual,

título = {​​​​​​​​Aimsun Next 23 User's Manual}​​​​​,
autor = {​​​​​​​​Aimsun}​​​​​​​​,
edición = {​​​​​​​​​​​​​​​Aimsun Next 23.0.0}​​​​​​​​​​​​​​​,
domicilio = {​​​​​​​​​​​​​​​Barcelona, Spain}​​​​​​​​​​​​​​​,
año = {​​​​​​​​​​​​​​​2023. [Online]}​​​​​​​​​​​​​​​,
mes = {​​​​​​​​​​​​​​​Accessed on: Month, Day, Year}​​​​​​​​​​​​​​​,
url = {​​​​​​​​​​​​​​​https://docs.aimsun.com/next/23.0.0/}​​​​​​​​​​​​​​​,
}​​​​​​​​​​​​​​​


Aimsun Next 20.0.5

@manual {​​​​​​​​AimsunManual,

título = {​​​​​​​​Aimsun Next 20.0.5 User's Manual}​​​​​​​​,
autor = {​​​​​​​​Aimsun}​​​​​​​​,
edición = {​​​​​​​​​​​​​​​Aimsun Next 20.0.5}​​​​​​​​​​​​​​​,
domicilio = {​​​​​​​​​​​​​​​Barcelona, Spain}​​​​​​​​​​​​​​​,
año = {​​​​​​​​​​​​​​​2021. [En software]}​​​​​​​​​​​​​​​,
mes = {​​​​​​​​​​​​​​​Accessed on: Month, Day, Year}​​​​​​​​​​​​​​​,
url = {​​​​​​​​​​​​​​​qthelp://aimsun.com.aimsun.20.0/doc/UsersManual/Intro.html}​​​​​​​​​​​​​​​,
}​​​​​​​​​​​​​​​

Aimsun Next 23

TY - COMP
T1 - Manual del usuario de Aimsun Next 23
A1 - Aimsun
ET - Aimsun Next Version 23.0.0
Y1 - 2023
Y2 - Acceso: Mes, Día, Año
CY - Barcelona, España
PB - Aimsun
UR - [En software]. Disponible en: https://docs.aimsun.com/next/23.0.0/


Aimsun Next 20.0.5

TY - COMP
T1 - Manual del usuario de Aimsun Next 20.0.5
A1 - Aimsun
ET - Aimsun Next Version 20.0.5
Y1 - 2021
Y2 - Acceso: Mes, Día, Año
CY - Barcelona, España
PB - Aimsun
UR - [In software]. Available: qthelp://aimsun.com.aimsun.20.0/doc/UsersManual/Intro.html