Running a simulation in Aimsun Next connected to SCATSim

August 2022 — Technical note #73

Dimitris Triantafyllos

Senior Product Specialist with a focus on real-time decision support. Dimitris works closely with the product management team to visualize, plan, and specify the roadmap for all Aimsun solutions.

SCATS is an intelligent, adaptive traffic control system installed in over 55,000 intersections across 187 cities and 28 countries worldwide. Developed by Road and Maritime Services in New South Wales, Australia, the SCATS adaptive traffic management system synchronises traffic signals to optimise traffic flow across a whole city, region or corridor. Intelligent algorithms process real-time data to adapt traffic signal timings that respond to unexpected conditions, predict traffic patterns and keep traffic moving. The result is less congestion, shorter journey times and increased safety and productivity.

The operation of the SCATS adaptive traffic control system can be reproduced in a mesoscopic or microscopic simulation in Aimsun Next by connecting to SCATSim. SCATSim is a suite of software modules developed by RMS to emulate a real SCATS deployment. With the SCATS Interface, Aimsun Next works as a server to communicate via sockets (TCP/IP) to one or multiple local traffic signal controllers, emulated by WinTraff (a SCATSim module), which act as clients.

Aimsun Next provides WinTraff with the detector actuation data every second and WinTraff responds with the signal group states, with all signal groups in red at the beginning of the simulation. If there are multiple controllers (and therefore multiple WinTraff instances) the communication is routed via SimHub (another module of SCATSim), which permits a single communication channel with the simulation and takes care of routing the interchanged data to and from the relevant WinTraff instance.

To achieve this interchange of data, it is essential that Aimsun Next objects, such as controllers, signals, or detectors match with the corresponding SCATS objects. The matching can be done automatically, using the SCATS ITS Interface , or manually, by opening the SCATS Access application and replicating the same objects and identifiers in the Aimsun Next software. In this example, the second approach is highlighted.

Note the following important requirements:

  • A license for Aimsun Next AND for Adaptive Control Interfaces
  • A license for SCATSim (2 USB dongles: 1 for SCATS Central Manager and 1 for SCATS Region)
  • Access to the SCATS Database and SCATS Region data
  • Applications: SCATS Central Manager, SCATS Central Manager Configuration, SCATS Region, SCATS Region Configuration, SCATS Access, SimHub, WinTraff
  • The exe application
  • SCATSim works only in Windows OS

It is necessary to set up several software applications prior to connecting SCATSim to the Aimsun Next simulation. Follow step by step instructions to prepare SCATS Central Manager, SCATS Region, SimHub, WinTraff applications:

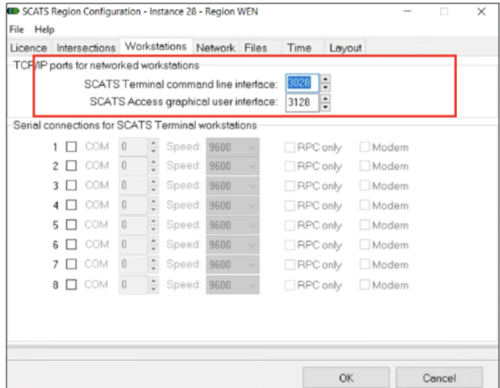
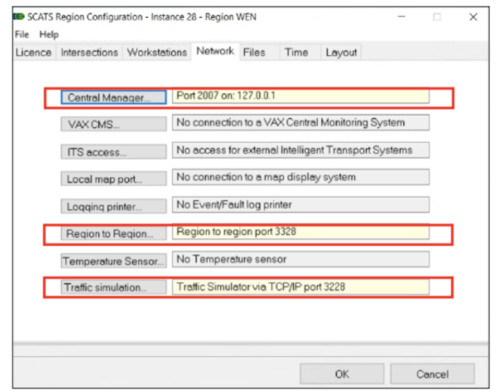
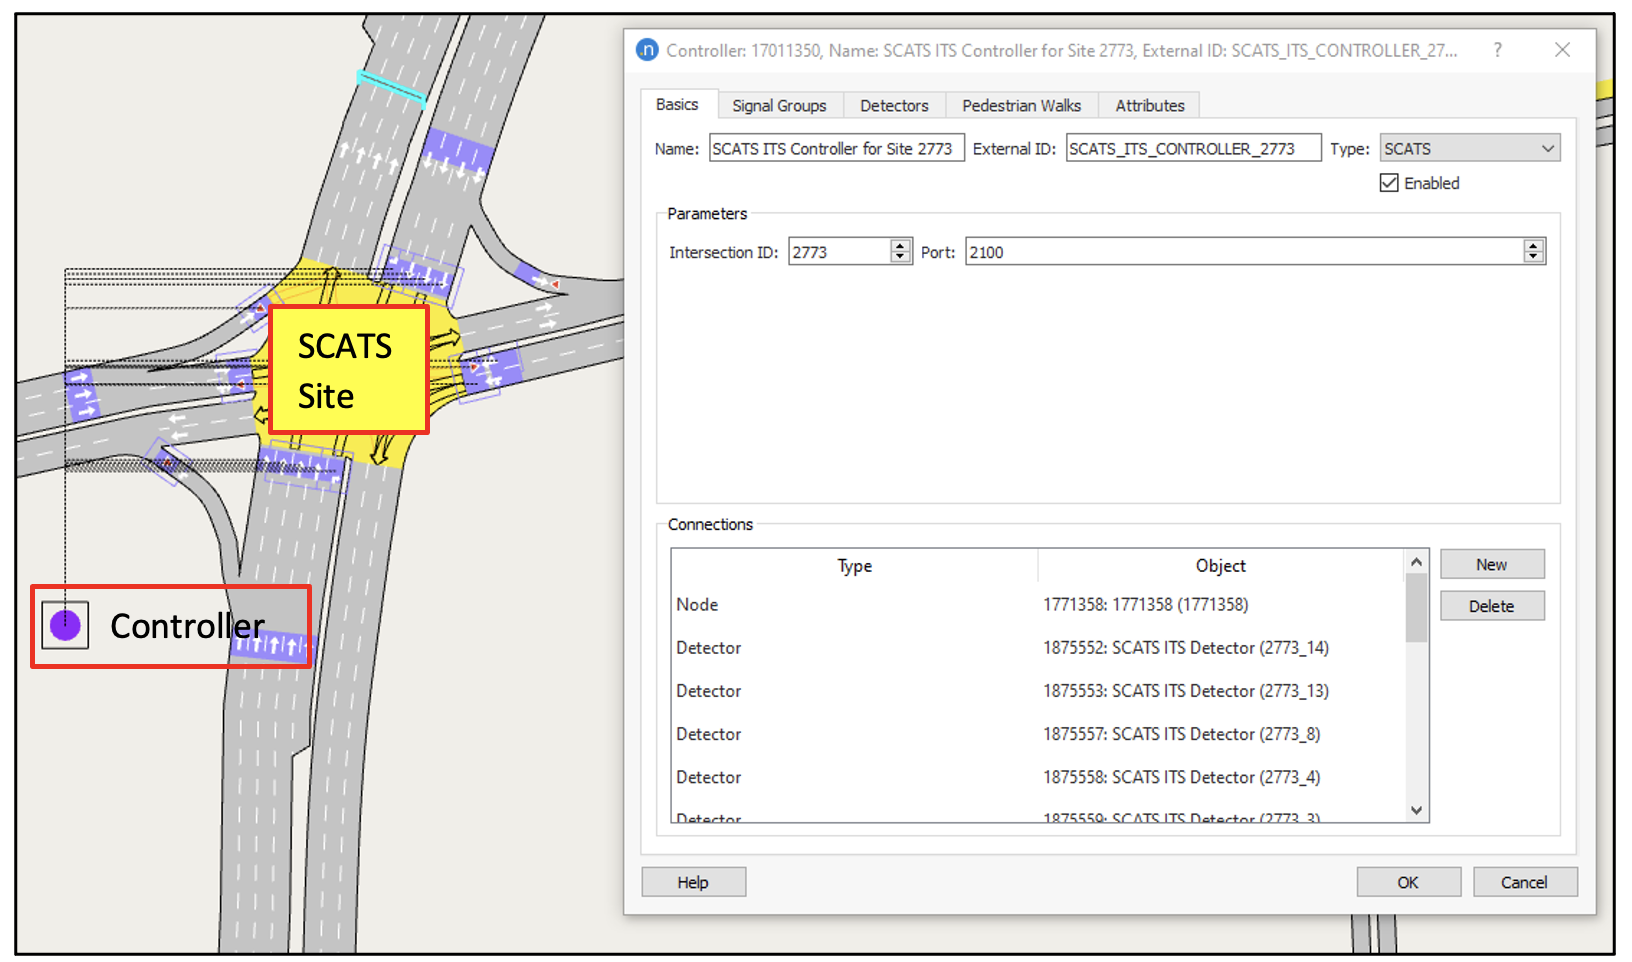
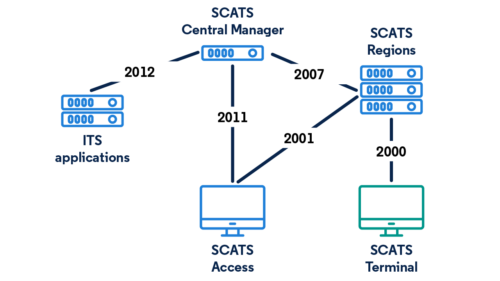
Note: For this quick guide, we used information from SCATS Central Manager Configuration user manual.pdf andSCATS Central Manager user manual.pdf. In the graph below, it is displayed the configuration of all different servers required and the default ports that each one communicates with the other to run the SCATS ITS Interface in the SCATS Terminal.

1.      Required Data

To setup the SCATS Central Manager you need the following data:


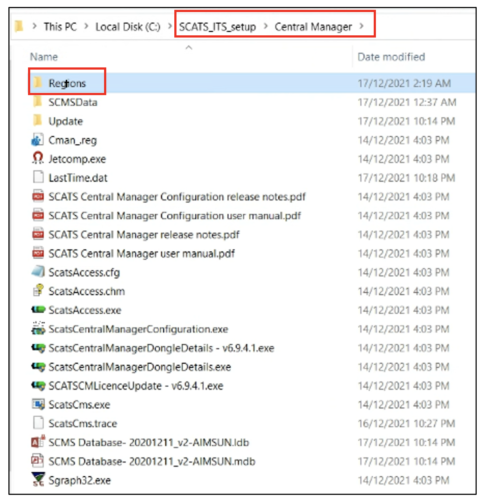
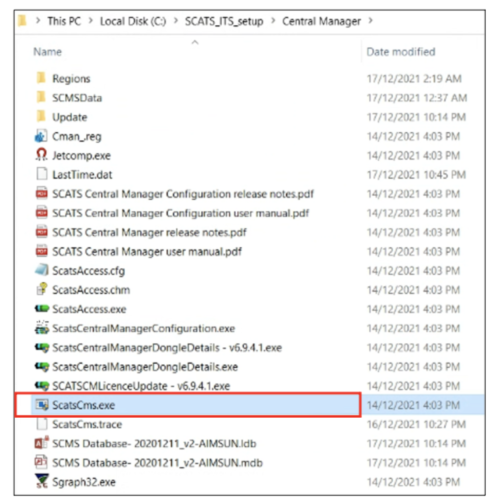
1. SCATS Central Manager folder

The SCATS Central Manager folder contains the following folders/files:

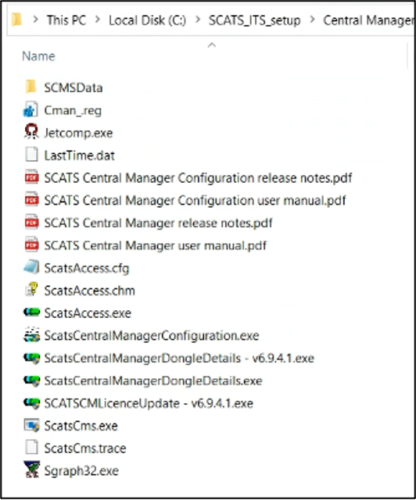
You can request this software from Transport for New South Wales or the local SCATS distributor.


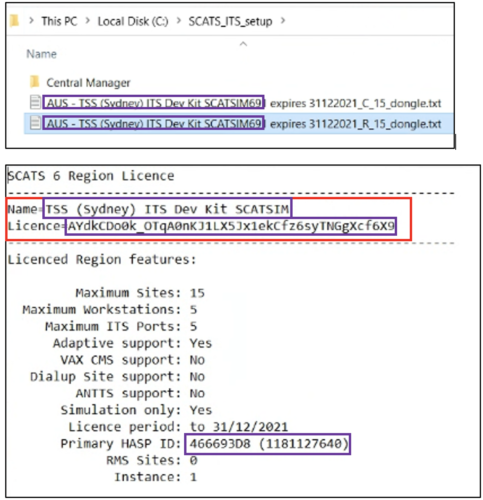
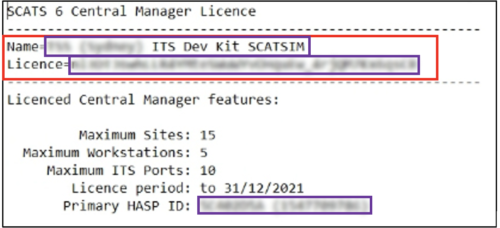
2. SCATS Central Manager License file

The SCATS Central Manager License file (.txt). The “Name” and the “License” information will be used later to set up the SCATS Central Manager.

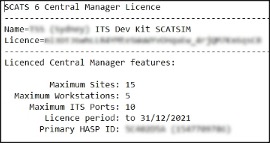
You can request this data from Transport for New South Wales or the local SCATS distributor.
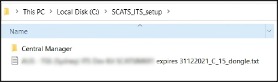
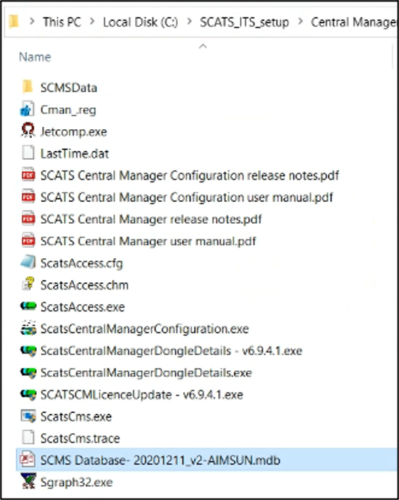
 

3. SCATS Database

The SCATS Database file should be preferably in “.mdb” format. If database type is “.sql”, then you must install SQL Express software to read the database. For more information, see the SCATS Central Manager user manual. The database should be placed inside the Central Manager folder:


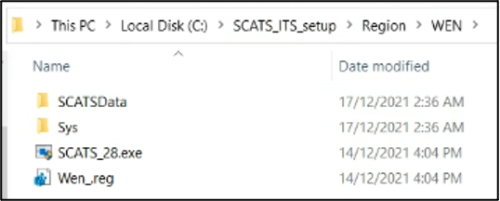
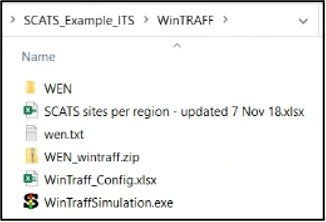
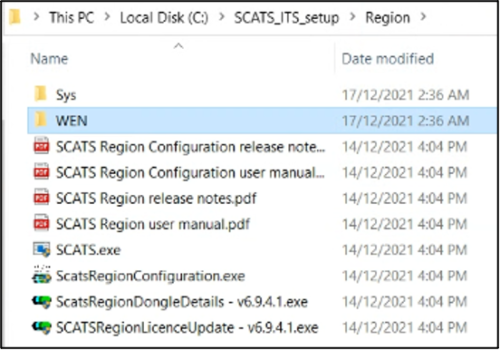
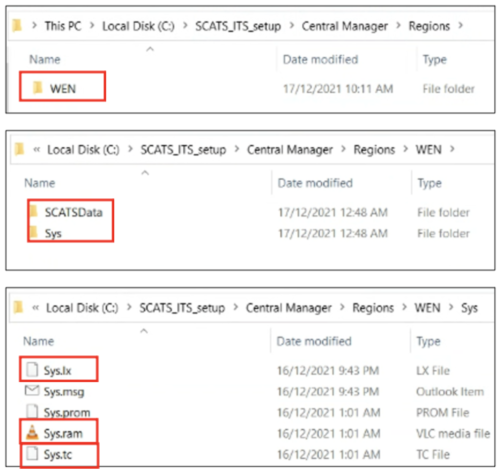
4. SCATS Region folder

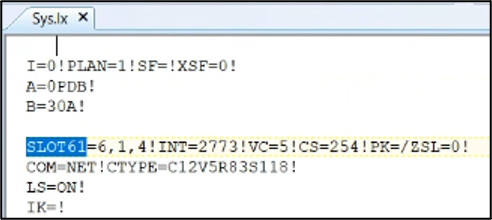
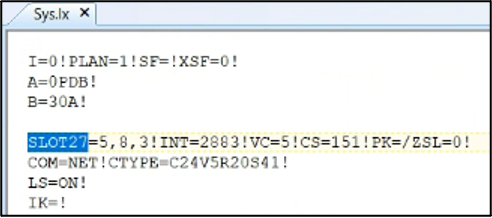
The SCATS Region folder usually includes a folder per region with the .tc, .lx, .ram, .hist and .vs files for each region. The SCATS Region folder may also include more files such as manuals and executable applications.  

At this point we need to clarify that the folder i.e.: SCATS_ITS_Setup \ Region is required to connect Aimsun Next with SCATSim. The folder SCATS_ITS_Setup\Central Manager\ Region is required to connect Aimsun Next with SCATS ITS. 

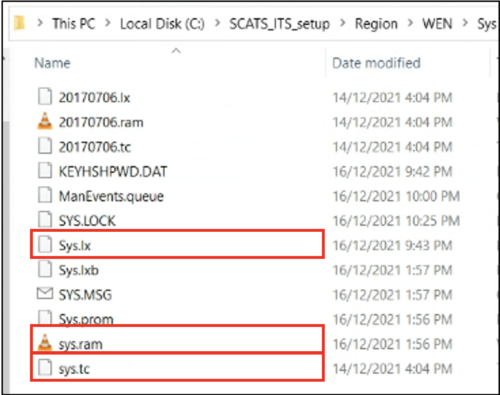
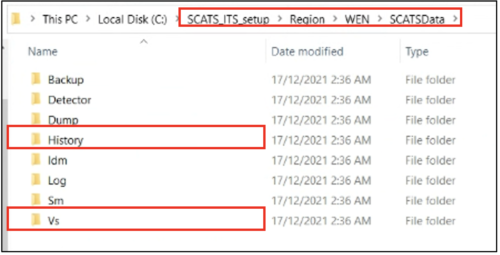
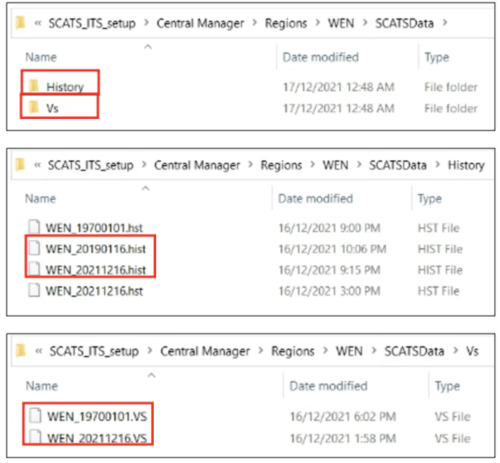
The .tc, .lx and .ram files per region are required to connect Aimsun Next with the SCATSim application. The .hist and .vs files per region are required for SCATS ITS if users would like to import historical signal timings and historical count measurements. 

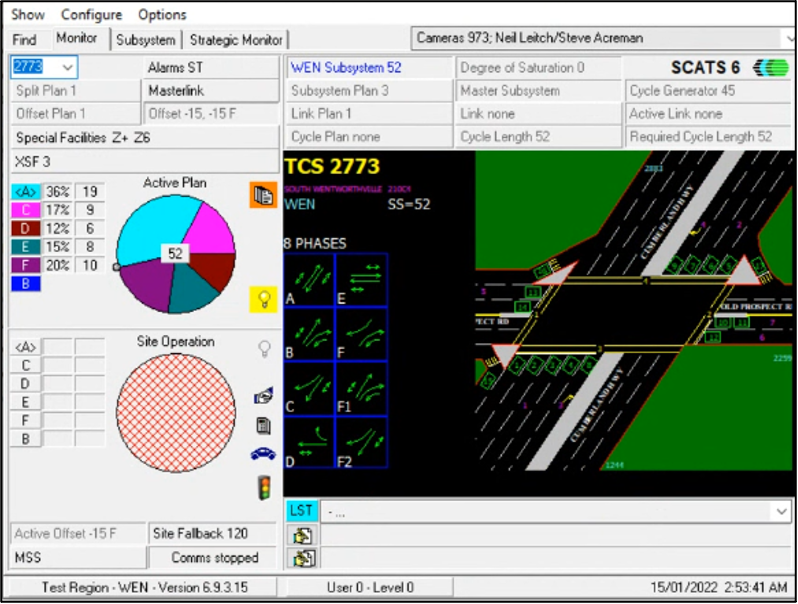
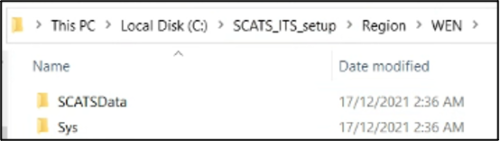
See an example of the SCATS Region folder below: 

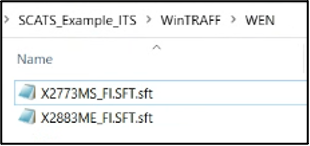
The Region folder should be also copied under the SCATS Central Manager folder; however the folder structure is different. The folder structure required is displayed in the screenshot below:


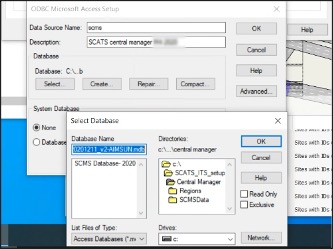
2.     Running the ODBC 32-bit application

To let the SCATS applications connect to the SCATS database we must create an ODBC data source with the 32-bit ODBC Administrator in %windir%\SysWOW64\odbcad32.exe.

1. Run the exe

2. Go to the Tab “System DSN” -> “Add…” ->

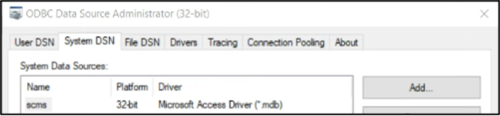
3. Add “Data Source Name” and “Description”. Then, press “Select…” -> go to the directory of the .mdb file and select that file. Then, select OK in all the opened windows.


3.     Configuring the SCATS Central Manager

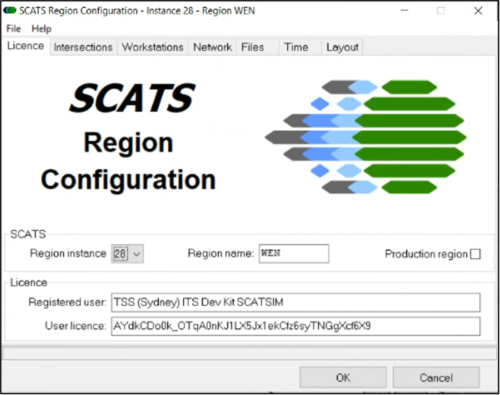
1. Double-click on the Central Manager/ScatsCentralManagerConfiguration.exe to access the SCATS Central Manager configuration window. Verify that the “SCATS System Name”, the “License Name” and “License Details” are consistent with the info in the SCATS Central Manager License file (.txt).

2. Launch the SCATS Central Manager application by double-clicking on Central Manager/ScatsCms.exe:

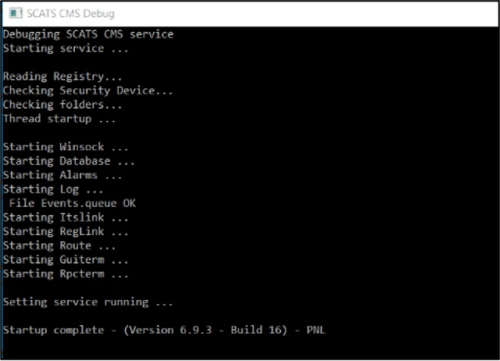
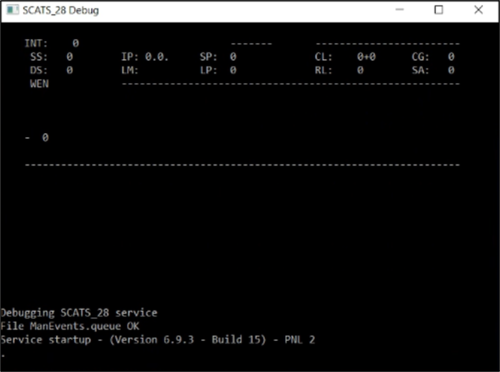
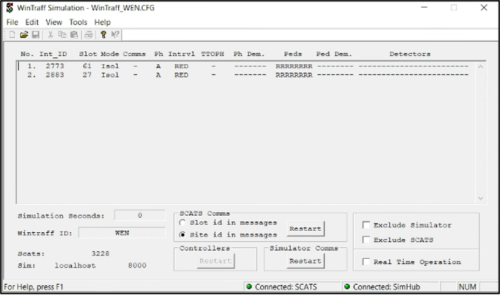
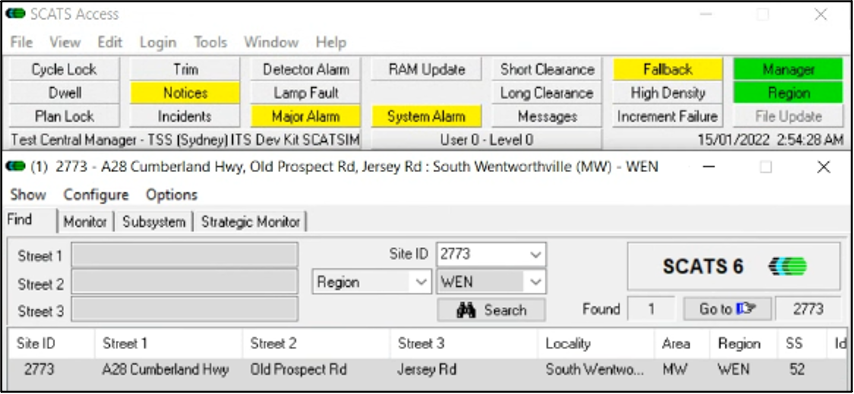
3. Once launched, a command line window named “SCATS CMS Debug” will open. After waiting for a couple of minutes, the following messages should be displayed “Setting service running…” – “Startup complete”:

Note: For this quick guide, we used information from SCATS Region Configuration user manual.pdf and SCATS Region user manual.pdf. In the graph below, it is displayed the configuration of all different servers required and the default ports that each one communicates with the other to run the SCATS ITS Interface in the SCATS Terminal.

1.      Required Data

To setup the SCATS Region you need the following data: 

1. SCATS Region License file

The SCATS Region License file (.txt). The “Name” and the “License” information will be used later to set up the Region application.

You can request this data from Transport for New South Wales or the local SCATS distributor

2. Configuring the SCATS Regions

1. Define an ID for each SCATS Region. In general, the ID can be custom, it can be defined manually by the user, starting with ID=1 for i.e.: Region WBOP and then summing up +1 for the next Region. However, it is essential to confirm this process by asking the Traffic Road Authorities. In some cases they may provide you with the ID for each SCATS Region.

2. Access the Region folder and copy-paste the SCATS.exe file inside the region folder /Region/REGIONNAME/.

3. Modify the name of the SCATS.exe based on the logic: SCATS_ID.exe (i.e.: SCATS_28.exe)

4. Double click on the /Region/ScatsRegionConfiguration.exe to access the SCATS Region configuration window.

5. Set the first or any other ID (i.e. 28) in the “SCATS Region instance” and set the corresponding “SCATS Region name” (i.e.: for ID=28, the name is WEN)

6. Verify that the “License” -> “Registered user” and “User license” fields are consistent with the SCATS Region License file (.txt) defined in the 1. Required data chapter. In some cases you may receive one license file for every SCATS region.

7. Then, select the Tab “Workstations” in the dialog of the SCATS Region configuration.

8. In “TCP/IP ports for networked workstations – SCATS Terminal command line interface” set a unique ID. We recommend to use the logic:  


NUMBER+SCATSRegionID i.e.: 3028. 

In “TCP/IP ports for networked workstations – SCATS Access graphical user interface” set a unique ID. We recommend using the logic:  

NUMBER+1+SCATSRegionID = 3128. 

See an example below, where NUMBER = 30


9. Then, select the Tab “Network”.

10. Apply the settings as indicated in the screenshot below to enable connections to: 

  • “Central Manager…”: Port 2007 on: 127.0.0.1 
  • “Region to Region”: Region to region port 3328  (NUMBER+3+SCATSRegionID = 3328) 
  • “Traffic simulation”: Traffic Simulator via TCP/IP port 3228 (NUMBER+2+SCATSRegionID = 3228)

11. To launch the SCATS Region application for this Region, double click on Region/REGION_NAME/SCATS_ID.exe  application:

12. Then, a command line window is expected to open printing the following messages displayed in the following screenshot:

13. Repeat steps 1-12 for each Region.

1. Copy-paste the SimHub folder in the same directory as the Central Manager and Region folders.

2. SimHub folder includes an application that you can launch by double-clicking on the SimHub.exe: 

3. Once the application is launched, by default, the option “Client Socket” > Port should set to 2100, the “Client Socket” > Host to localhost and the “Server Socket Port” to 8000. If all settings are applied correctly, then on the right side, a list with all Regions connected to SimHub should be displayed (i.e.: WEN). 

1. WinTraff folder should include the Region folders (i.e.: WEN) and the application “WinTraffSimulation.exe”. This data is provided by the Road Traffic Authorities.

2. Inside each region folder (i.e.: WEN) are stored .sft files for each SCATS Site of that region.   

3. In this directory, if the configuration file is not provided, the user should create and define the configuration file named as WinTraff_REGIONNAME.CFG (WinTraff_WEN.CFG)

4. This file must include the following info: 

Where:

#cfg 

id = REGIONNAME 

simhost = localhost (as defined in SimHub) 

simport = 8000 (as defined in SimHub)  

scatsport = 3228 (as defined in the SCATS region Configuration.exe > Network > Traffic Simulation > TCP/IP) 

usesiteids = True (to use the site IDs as identifiers) 

path = 

61 = X2773MS_FI.SFT.sft (.sft file for SCATS Site ID: 2773) 

27 = X2883ME_FI.SFT.sft (.sft file for SCATS Site ID: 2883) 

! 


Note that 61 and 27 numbers refer to the SLOT ids with respect to the SCATS Sites 2773 and 2883 that belong to this Region. These SLOT ids can be found inside the Region folder in Region/REGIONNAME/Sys/Sys.lx.  

Important: To enable the SCATS emulation in Aimsun Next only for few SCATS Sites, then in the WinTraff configuration file you can set only the desired SCATS Sites. 

5. Double-click in the /WinTRAFF/WinTraffSimulation.exe application.

6. Select File -> Open.

7. Select the configuration file (.CFG) with the SCATS Sites of your interest (i.e.: 2773, 2883). 

Preparing the Aimsun Next network objects

In order for Aimsun Next and SCATSim to understand which detectors and signal groups they refer to in the communication during the simulation, you have to define for controllers, signal groups and detectors a common identifier.

First, open the SCATS Access software to obtain the required information for this SCATS Site ID:2773.

1. Double click on the /Central Manager/SCATSAccess.exe and wait to see the window below: 

2. In the Site ID field set the desired SCATS Site ID (i.e.: 2773) to visualize its geometry, signal groups, phases and detectors.

Summary:

  • SCATS Site ID: 2773
  • 8 PHASES: A;B;C;D;E;F;F1;F2
  • 17 DETECTORS

Then, open the Aimsun Next document to set up the required settings for the SCATS Site ID: 2773.

3. Each signal group in Aimsun Next should be defined as it is in the SCATS database with the same turns associated. You can use SCATS Access to check which turns are controlled by each signal group and manually set the same in Aimsun Next.


4. For each node in Aimsun Next controlled by the SCATSim, the control plan must be set to External. A pre-timed control plan can be provided so that it will be used in case the connection to SCATSim fails.

5. Each detector in Aimsun Next should be positioned, named, and defined as in the SCATS database. The minimum detector measuring capabilities required to be activated depend on the function of the detector. SCATS detectors are differentiated between physical (measuring “count” and “occupancy”) and logical (beacons: identifying public transport vehicles). Logical detectors must have activated the “Equipped vehicle” measuring capability in addition to “count” and “occupancy”. They are always associated with a set of public transport lines. Note that detector occupancy measurements are strongly related to the detector length. So, Aimsun Next detector length should correspond to the SCATS detector length.

6. Create a new Aimsun controller object. Each SCATS Site should be represented in Aimsun Next as one SCATS type Aimsun controller object.

7. In the *Basics* Tab of the controller object:

    • The controller object must be connected to the node object. However, each SCATS Site can be represented as one or more Aimsun nodes. In that case, both nodes must be connected to the same controller object.
    • SCATS detectors must be connected to the controller object.
    • The checkbox “Enabled” must be checked. The Intersection ID must be set equal to the SCATS Site ID and the Port must set equal to the simulation connection port in SimHub.


8. In the Signal Group Tab of the Controller object:

    • Assign the Signal Groups and set the ID to map those with the SCATS stage ID.

9. In the Detectors Tab of the Controller object:

    • Add all the detectors and for each set the ID to map it with the SCATS Detector ID.

10. Do the same for the rest of the SCATS Sites in the Aimsun Next network.


11. Once done, you are set to launch an Aimsun Next simulation (Micro, Meso or Hybrid) and emulate the SCATS controller traffic signal logic in the Aimsun Next network.


Important:
To ensure that Aimsun Next and SCATS applications remain in step, synchronization tokens are passed between them every simulation step. SCATS assumes a data transfer is made every second so every 1 second detector data should be available. Therefore the detector cycle in Dynamic Scenario > Outputs to Generate should be set to 1 second.


For more detailed information, open the Aimsun Next User Manual – SCATS Interface chapter.

More technical notes

  • Got a question? Get in touch.

    We are here to help!

SHARE

Cite Aimsun Next


Aimsun Next 23

Aimsun (2023). Aimsun Next 23 User's Manual, Aimsun Next Version 23.0.0, Barcelona, Spain. Accessed on: July. 19, 2023. [Online].
Available: https://docs.aimsun.com/next/23.0.0/


Aimsun Next 20.0.5

Aimsun (2021). Aimsun Next 20.0.5 User's Manual, Aimsun Next Version 20.0.3, Barcelona, Spain. Accessed on: May. 1, 2021. [In software].
Available: qthelp://aimsun.com.aimsun.20.0/doc/UsersManual/Intro.html
 

Aimsun Next 23

@manual {​​​​​​​​AimsunManual,

title = {​​​​​​​​Aimsun Next 23 User's Manual}​​​​​,
author = {​​​​​​​​Aimsun}​​​​​​​​,
edition =  {​​​​​​​​​​​​​​​Aimsun Next 23.0.0}​​​​​​​​​​​​​​​,
address = {​​​​​​​​​​​​​​​Barcelona, Spain}​​​​​​​​​​​​​​​,
year  = {​​​​​​​​​​​​​​​2023. [Online]}​​​​​​​​​​​​​​​,
month = {​​​​​​​​​​​​​​​Accessed on: Month, Day, Year}​​​​​​​​​​​​​​​,
url = {​​​​​​​​​​​​​​​https://docs.aimsun.com/next/23.0.0/}​​​​​​​​​​​​​​​,
}​​​​​​​​​​​​​​​


Aimsun Next 20.0.5

@manual {​​​​​​​​AimsunManual,

title = {​​​​​​​​Aimsun Next 20.0.5 User's Manual}​​​​​​​​,
author = {​​​​​​​​Aimsun}​​​​​​​​,
edition =  {​​​​​​​​​​​​​​​Aimsun Next 20.0.5}​​​​​​​​​​​​​​​,
address = {​​​​​​​​​​​​​​​Barcelona, Spain}​​​​​​​​​​​​​​​,
year  = {​​​​​​​​​​​​​​​2021. [In software]}​​​​​​​​​​​​​​​,
month = {​​​​​​​​​​​​​​​Accessed on: Month, Day, Year}​​​​​​​​​​​​​​​,
url = {​​​​​​​​​​​​​​​qthelp://aimsun.com.aimsun.20.0/doc/UsersManual/Intro.html}​​​​​​​​​​​​​​​,
}​​​​​​​​​​​​​​​

Aimsun Next 23

TY  - COMP
T1  - Aimsun Next 23 User's Manual
A1  - Aimsun
ET - Aimsun Next Version 23.0.0
Y1  - 2023
Y2 - Accessed on: Month, Day, Year
CY  - Barcelona, Spain
PB  - Aimsun
UR  - [In software]. Available: https://docs.aimsun.com/next/23.0.0/


Aimsun Next 20.0.5

TY  - COMP
T1  - Aimsun Next 20.0.5 User's Manual
A1  - Aimsun
ET - Aimsun Next Version 20.0.5
Y1  - 2021
Y2 - Accessed on: Month, Day, Year
CY  - Barcelona, Spain
PB  - Aimsun
UR  - [In software]. Available: qthelp://aimsun.com.aimsun.20.0/doc/UsersManual/Intro.html