Importing SCATS traffic signal control data into Aimsun Next

Technical Note #66

By Dimitris Triantafyllos

February 2022

SCATS  is an intelligent, adaptive traffic control system installed in over 55,000 intersections across 187 cities and 28 countries worldwide. SCATS adaptive traffic management system synchronises traffic signals to optimise traffic flow across a whole city, region or corridor. Intelligent algorithms process real-time data to adapt traffic signal timings that respond to unexpected conditions, predict traffic patterns and keep traffic moving. The result is a reduction in congestion, shorter journey times and increased safety and productivity.


The SCATS ITS application is intended mainly to provide data regarding the state of the server and geometry information on each SCATS site for visualization purposes. This information can be also used to import SCATS intersections´ layout, signal groups, detectors in a new SCATS layer in Aimsun Next. These data can be automatically matched with an existing network geometry in Next, so that SCATS signal groups and detectors will be created on top of an existing network. However, the user should verify that the data imported in the SCATS new layer are matching correctly to the existing network layer. Once the signal groups in the Aimsun Next network are verified to be correct, control plans that match those defined in SCATS can be imported. Also, when detectors are labelled as they are in the SCATS layer, count measurements from SCATS logs can be imported.


Note the following important requirements:

  • A license for both Aimsun Next + Adaptive Control Interfaces
  • A license for SCATS ITS Port (2 USB dongles)
  • Access to the SCATS Database and SCATS Region data
  • Applications: SCATS Central Manager, SCATS Central Manager Configuration, SCATS Access
  • The exe application

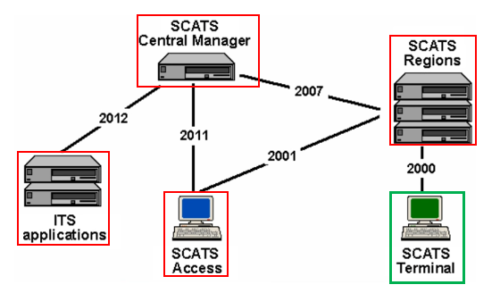
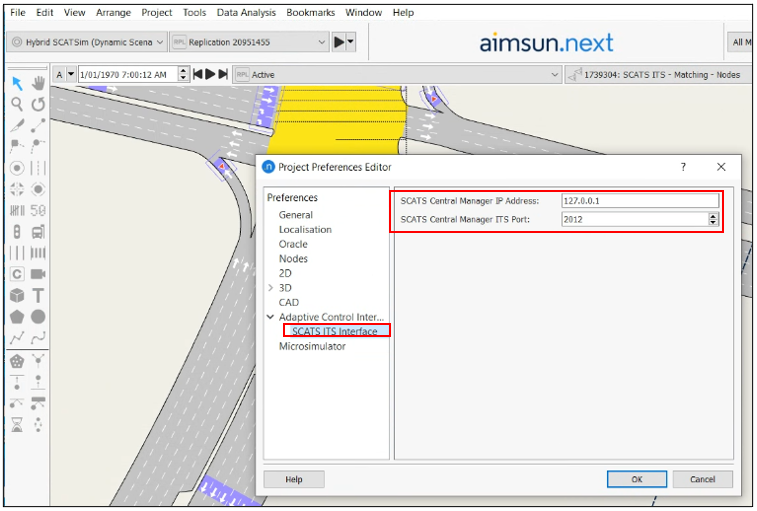
Note: For this quick guide, we used information from SCATS Central Manager Configuration user manual.pdf and SCATS Central Manager user manual.pdf. In the graph below, it is displayed the configuration of all different servers required and the default ports that each one communicates with the other to run the SCATS ITS Interface in the SCATS Terminal.


1. Required Data

To setup the SCATS Central Manager you need the following data:


  1. SCATS Central Manager folder: The SCATS Central Manager folder contains the following folders/files:


You can request this data from Transport for New South Wales or the SCATS local distributor.


  1. SCATS Central Manager License file: The SCATS Central Manager License file (.txt). The “Name” and the “License” information will be used later to set up the SCATS Central Manager.


You can request this data from Transport for New South Wales or the SCATS local distributor.


  1. SCATS Database: The SCATS Database file should be preferably in “.mdb” format. If database type is “.sql”, then you must install SQL Express software to read the database. For more information, see the SCATS Central Manager user manual. The database should be placed inside the Central Manager folder:


  1. SCATS Region folder: The SCATS Region folder usually includes a folder per region with the .tc, .lx, .ram.hist and .vs files for each region. The SCATS Region folder may also include more files such as manuals and executable applications.


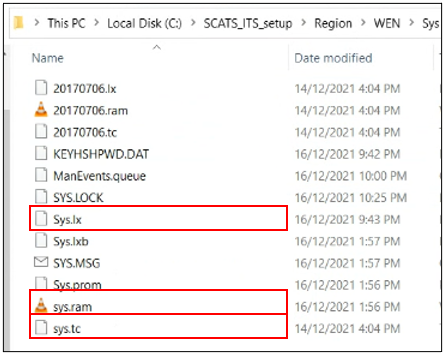
At this point we need to clarify that the folder i.e.: SCATS_ITS_Setup \ Region is required to connect Aimsun Next with SCATSim. The folder SCATS_ITS_Setup\Central Manager\ Region is required to connect Aimsun Next with SCATS ITS.


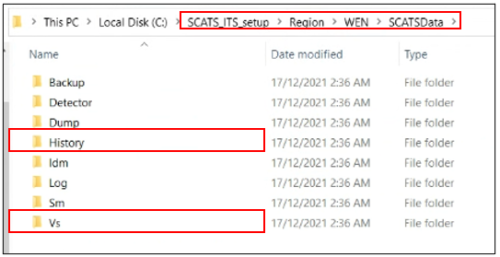
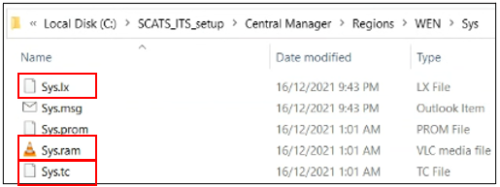
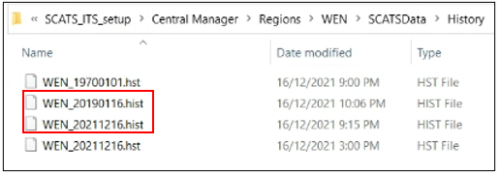
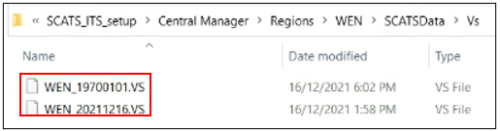
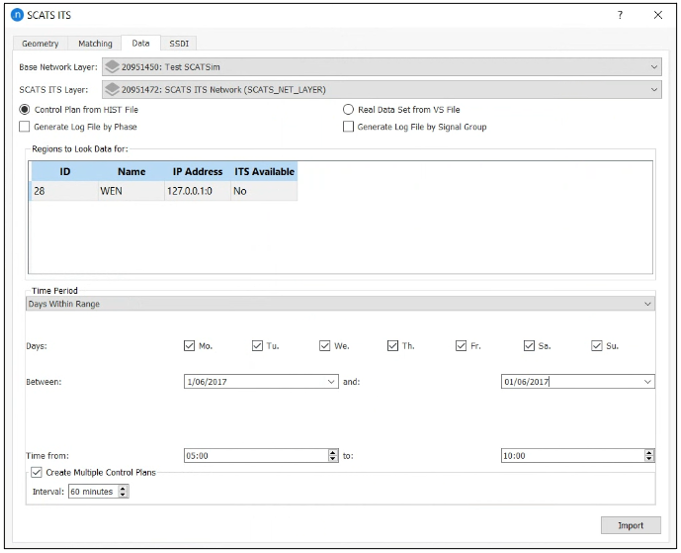
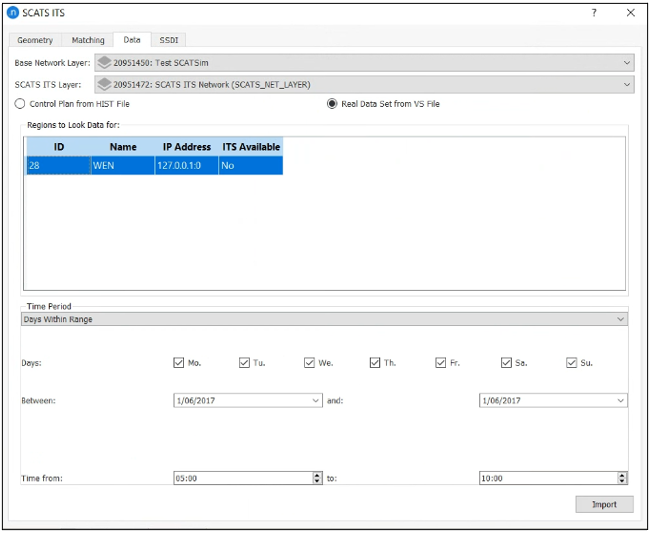
The .tc, .lx and .ram files per region are required to connect Aimsun Next with the SCATSim application. The .hist and .vs files per region are required for SCATS ITS if users would like to import historical signal timings and historical count measurements.


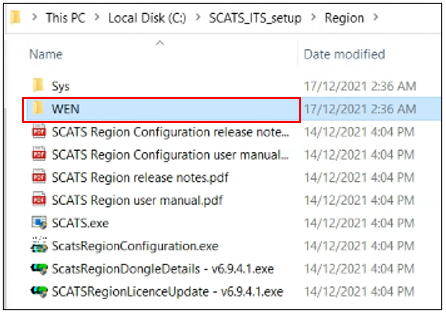
See an example of the SCATS Region folder below:


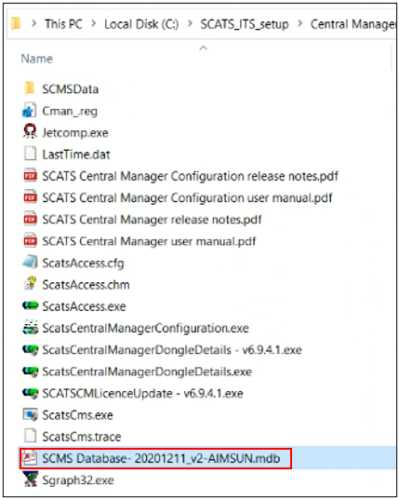
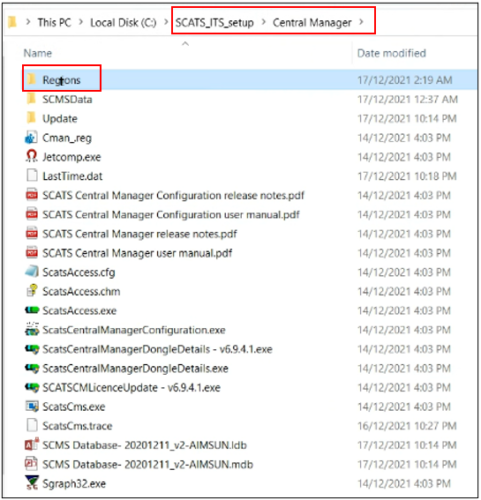
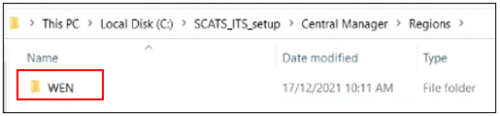
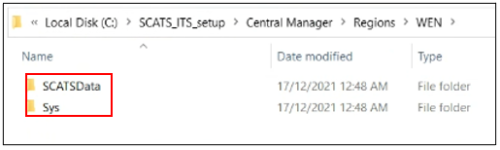
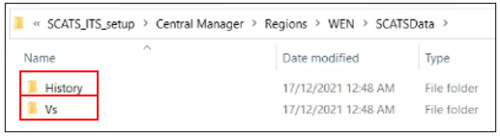
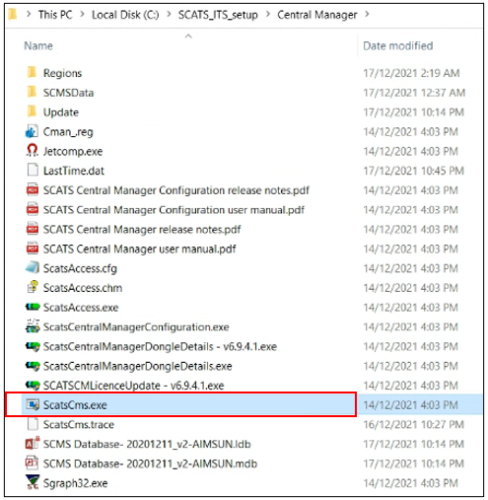
The Region folder should be also copied under the SCATS Central Manager folder; however the folder structure is different. The folder structure required is displayed in the screenshot below:


2.     Running the ODBC 32-bit application

To let the SCATS applications connect to the SCATS database we must create an ODBC data source with the 32-bit ODBC Administrator in %windir%\SysWOW64\odbcad32.exe.


  1. Run the exe
  2. Go to the Tab “System DSN” -> “Add…” ->


  1. Add “Data Source Name” and “Description”. Then, press “Select…” -> go to the directory of the .mdb file and select that file. Then, select OK in all the opened windows.


3.     Configuring the SCATS Central Manager

  1. Double click on the Central Manager/ScatsCentralManagerConfiguration.exe to access the SCATS Central Manager configuration window. Verify that the “SCATS System Name”, the “License Name” and “License Details” are consistent with the info in the SCATS Central Manager License file (.txt).


  1. Launch the SCATS Central Manager application by double-clicking on Central Manager/ScatsCms.exe:


  1. Once launched, a command line window named “SCATS CMS Debug” will open. After waiting for a couple of minutes, the following messages should be displayed “Setting service running…” – “Startup complete”:


1. Preparing the Aimsun Next SCATS ITS Interface

  1. Launch Aimsun Next
  2. Open the .ang file
  3. In the Main Menu Bar, select Edit and then Preferences. Select Adaptive Control Interfaces, then SCATS ITS Interface and edit those fields:
    • SCATS Central Manager IP Address: 127.0.0.1 (keep this IP Address if SCATS Central Manager is running in the same computer)
    • SCATS Central Manager ITS Port: 2012
  1. To import the SCATS data, first we should check which is the base layer in Aimsun Next that holds the current network nodes as we will have to select it once starting the importation process (i.e.: Test SCATSim).


2. Using the SCATS ITS Interface

To import the SCATS data into an Aimsun Next traffic network, the relationship between objects in Aimsun Next and in SCATS ITS needs to be established. SCATS Database has internal identifiers for the objects that the server manages:


  • SCATS Sites (intersections) have a unique ID in the SCATS Database,
  • Detectors and signal groups inside each SCATS Site also have an ID that identifies them within the Site they belong to.


The mapping between SCATS Sites and the Aimsun Next objects can be done manually using an external column or with the help of the SCATS ITS Interface by importing geometry from SCATS ITS and performing a matching over the base network (manual verification of the matching is required). We will describe both modes in the following examples:


To launch the SCATS ITS Interface, go to the Main Menu, select Tools and then SCATS ITS Interface as displayed below:

Step 1: Importing SCATS Sites geometry

The SCATS ITS Interface can request geometry information of the SCATS Sites from the SCATS ITS and build a representation of them in Aimsun Next. The imported geometry will be stored on a separated layer on top of the base network to make the task of verifying the number of lanes, the detector placement, the signal group naming, etc. easier.


In the SCATS ITS Interface dialog in the Tab “Geometry”, select the existing network in the base layer that the Aimsun Next nodes are assigned. The SCATS ITS Interface offers two main modes to start the importation of the SCATS Sites geometry, depending on the information already present in the base network:


A. In case the base network nodes do not have any SCATS Site ID stored in any of the external attributes, select the mode: Using a node as reference.


  1. Set the Aimsun Next network node ID and the corresponding SCATS Site ID (Road traffic authorities should provide you with the location of at least one SCATS Site ID (i.e.: 2693)).
  2. To import all the SCATS Site IDs in the Database, in “Source of Sites”, select “Expand from Reference”. In the “Number of Sites” set “All”

To import a specific list of SCATS Site IDs based on the reference SCATS Site ID, then in the “Source of Sites” select the “Use List of Sites” and enter the SCATS Site IDs separated with comma as displayed in the screenshot below:

This importation mode allows one node to be set as reference for the import of the rest of the SCATS Sites in the Aimsun Next network. In this case, information about this SCATS Site will be gathered, then information on neighboring SCATS Sites will also be requested. This way, SCATS Sites surrounding the reference one will be imported.


Note:

  • The weakness of this method is that the SCATS Sites imported depend on the continuity of the neighboring SCATS Sites. If a SCATS Site is present in the SCATS Database but isolated (meaning that there is no reference on this SCATS Site for its neighboring SCATS Sites), then it will not be imported in the Aimsun Next SCATS layer.
  • We recommend using this mode when importing a high number of SCATS Sites in large-scale Aimsun Next networks. Once done, you can then manually verify the SCATS Sites imported activating both base and SCATS layer, creating view modes or using the Table View to filter and compare.


B. If the SCATS Sites are already identified (manually or from a previous importation) in Aimsun Next nodes via an external node attribute, then this external attribute can be used to import SCATS geometry on top of the identified nodes. Select the Mode: Use attribute on nodes as SCATS Site ID. Select the Attribute where the SCATS Site IDs are stored.

Note:

  • In case, you want to re-import geometry, the external attribute that we need to use as reference is the “SCATS ITS Matched Site ID” that was created automatically in the first importation effort.
  • In case, you want to import only a specific (known) list of SCATS Sites in the SCATS Database, use the option “Import List of Sites” entering the SCATS Site IDs separated by comma.


Once the importation process of the SCATS Sites geometry is finished, then:


  1. A new layer named “SCATS ITS Network” created including the new sections, node, turns, detectors imported from the SCATS Database. See an example of this layer with its objects in the screenshot below:
  1. New external attributes created in the Node. Double-click on the base layer node and check the “SCATS ITS Matched Site ID” which should be matched correctly with the External ID of the node in the “SCATS ITS Network” layer.


  1. Double click on the node imported from SCATS Database and check the external columns created:
    • SCATS ITS Import – Next SCATS Sites: It holds the information of neighboring SCATS Sites
    • SCATS ITS Import – Phases & Signals: It holds phasing and signal information
    • SCATS ITS Matched to base on import: It contains the number of base layer nodes that this SCATS ITS matched
    • SCATS_PHASE_LIST: It holds phasing information
  1. Detectors and Signal groups created in the SCATS nodes imported. Detector Name consists of the SCATS_SITE_ID + SCATS_DETECTOR_ID i.e.: 2693_11
  1. To be able to import signal timing data from SCATS (.hist files), the signal groups on each intersection must be identified. In this case the “Name” of the signal groups is used (1,2,3,4…8). SCATS only gives the ID of the phase activated for each time entry on the logs. Therefore, a relationship between SCATS phases and signal groups is done using a new attribute named “SCATS ITS Import – Phases & Signals”. The value of this attribute is a string containing the IDs of the signal groups for each SCATS phase. In the example below, the SCATS phase “A” sets signal groups “1”, “2”, “9”, “10” to green. Phase “B” uses signals “1”, ”3” and “9”, and so on.

Step 2: Matching SCATS nodes imported and Aimsun nodes

SCATS ITS Interface can perform some automatic matching between the two layers: the “SCATS ITS Network” and the base network layer.


  1. In the SCATS ITS Layer, select the layer with the SCATS geometry imported.
  2. In the Base Network Layer, select the base layer of the base network.
  3. In the Nodes option, choose between matching all the nodes identified as SCATS sites in the network or choose a subset by writing site identifiers in the text box separate by comma.
  4. In the Match Nodes to Base, choose which actions the tool should perform while matching
    • Copy Signal Groups. Turns in the base network will be matched with turns in the SCATS site. Signal Groups as defined by SCATS site will be created in the base network. The Signal Groups created will have the same names (usually a number) as their SCATS counterparts.
    • Clear Signal Groups. If this option is chosen, the Signal Groups in the nodes of the base network will be deleted before the matching is performed.
    • Copy Detectors. With this option checked the plug-in will try to create new detectors on the base network that match those in the SCATS sites. In this case, detectors are identified by its “External ID”.
    • Create Aggregated Detectors. With this option checked, new detectors covering all section lanes will be created to aggregate count data imported in the next step.
  1. In the Network Objects, you can also create a Fixed Control Plan. This Control Plan will have the phases and the signal groups as defined by SCATS. Since no timing information is available, dummy timings will be used (green time = 12 sec for every phase and interphase = 5 sec).


See an example of the parameters defined below:

See an example of the dummy Control Plan created below:

  1. Detectors copied from the SCATS layer to the base network layer. The process successfully identified the slip lanes (separated sections) and copy the correct SCATS detectors across to the base layer geometry. In any case, the user needs to verify that the detectors were copied across correctly.
  2. The controller object has been created and the associated parameters were imported correctly; detectors were assigned as connections; signal groups assigned; detectors mapped their IDs. Note that the controller must be enabled manually by the user either per SCATS Controller object or automatically using the Table View.

We recommend performing the matching of each object type separately (first signal groups, second detectors, third control plans and controllers) so that you will be able to verify that all data for all nodes have been imported correctly.


Step 3: Importing SCATS signal timings and count data

Verification checks:

  • To import detector count data from the SCATS log files (.vs), you must verify that the detectors were imported correctly from the SCATS Database and then successfully matched (copied across) to the base layer.
  • To import signal timing information from SCATS log files (.hist), you must verify that the Aimsun signal groups and the SCATS identifiers as well as the signal groups activated for each phase are set correctly.
  • Both verifications must be done manually or via scripting for each SCATS Site.


Preparation:

Place the SCATS log files (detector count data: .vs, signal timings: .hist) to the /Central Manager/Region/REGIONNAME/SCATSData/History/ and /Central Manager/Region/REGIONNAME/SCATSData/Vs/ folders. These are files that hold daily data and their name is based on the corresponding date (i.e.: 20170601.hist or 20170601.vs)


  1. To import data from SCATS Servers, go to the tab “Data” of the SCATS ITS Interface dialog
  2. In the Base Network Layer, select the base layer.
  3. In the SCATS ITS Layer, select SCATS ITS Network.
  4. To import control plan data, select “Control Plan from HIST File.
  5. Then mark the “Regions to Look data for:” WEN. You may use the “Shift” button to select multiple regions to retrieve data.
  6. The Time Period can be defined by selecting a starting and end dates plus a starting and end times. Specific weekdays can be selected to create queries such as for example: “All Mondays of a July, from 6am to 11am”.
  1. A Control Plan is created. It references with signal timings in all the Nodes matched with SCATS sites on the network. The phases created on each control plan contain the average green time calculated for the time period provided. You may check the option to “Create Multiple Control Plans” and set the interval to a custom duration.
  1. To import detector count data as Real Data Set object, select the “Real Data Set from VS File” option, select the regions to import data and press “Import”.
  1. The files for each day and region are requested from the server and parsed. A Real Data Set is created with mean, minimum and maximum counts and flows. This references a set of “CSV” files created by the plug-in that contain all the data gathered from the servers.

Enjoy a video showing the procedure of importing SCATS data step-by-step using the SCATS ITS Interface.

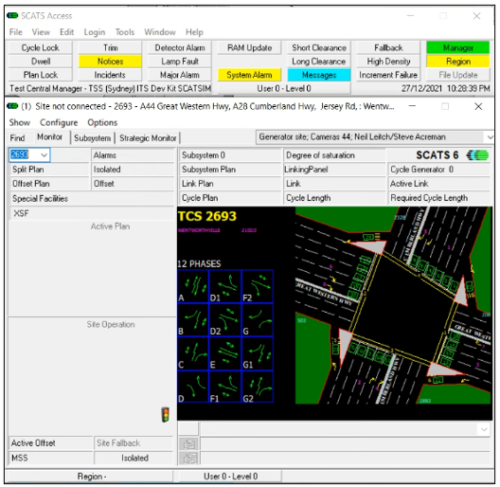
To perform such verification, we can use the SCATS Access application.


  1. Double click in the Central Manager/ScatsAccess.exe to open the SCATS Access application.


  1. In the Site ID set the desired SCATS Site ID (i.e: 2693) to visualize. The Region field will be filled automatically (i.e.: WEN).
  2. Select Search
  3. At this point, you can validate that the detectors have been imported correctly from the SCATS Database by checking their IDs with the External ID of the imported detectors in Aimsun Next. You can also validate that the signal groups are associated to the correct phases in the Aimsun Next network.


More technical notes

  • Got a question? Get in touch.

    We are here to help!

SHARE

Cite Aimsun Next


Aimsun Next 23

Aimsun (2023). Aimsun Next 23 User's Manual, Aimsun Next Version 23.0.0, Barcelona, Spain. Accessed on: July. 19, 2023. [Online].
Available: https://docs.aimsun.com/next/23.0.0/


Aimsun Next 20.0.5

Aimsun (2021). Aimsun Next 20.0.5 User's Manual, Aimsun Next Version 20.0.3, Barcelona, Spain. Accessed on: May. 1, 2021. [In software].
Available: qthelp://aimsun.com.aimsun.20.0/doc/UsersManual/Intro.html
 

Aimsun Next 23

@manual {​​​​​​​​AimsunManual,

title = {​​​​​​​​Aimsun Next 23 User's Manual}​​​​​,
author = {​​​​​​​​Aimsun}​​​​​​​​,
edition =  {​​​​​​​​​​​​​​​Aimsun Next 23.0.0}​​​​​​​​​​​​​​​,
address = {​​​​​​​​​​​​​​​Barcelona, Spain}​​​​​​​​​​​​​​​,
year  = {​​​​​​​​​​​​​​​2023. [Online]}​​​​​​​​​​​​​​​,
month = {​​​​​​​​​​​​​​​Accessed on: Month, Day, Year}​​​​​​​​​​​​​​​,
url = {​​​​​​​​​​​​​​​https://docs.aimsun.com/next/23.0.0/}​​​​​​​​​​​​​​​,
}​​​​​​​​​​​​​​​


Aimsun Next 20.0.5

@manual {​​​​​​​​AimsunManual,

title = {​​​​​​​​Aimsun Next 20.0.5 User's Manual}​​​​​​​​,
author = {​​​​​​​​Aimsun}​​​​​​​​,
edition =  {​​​​​​​​​​​​​​​Aimsun Next 20.0.5}​​​​​​​​​​​​​​​,
address = {​​​​​​​​​​​​​​​Barcelona, Spain}​​​​​​​​​​​​​​​,
year  = {​​​​​​​​​​​​​​​2021. [In software]}​​​​​​​​​​​​​​​,
month = {​​​​​​​​​​​​​​​Accessed on: Month, Day, Year}​​​​​​​​​​​​​​​,
url = {​​​​​​​​​​​​​​​qthelp://aimsun.com.aimsun.20.0/doc/UsersManual/Intro.html}​​​​​​​​​​​​​​​,
}​​​​​​​​​​​​​​​

Aimsun Next 23

TY  - COMP
T1  - Aimsun Next 23 User's Manual
A1  - Aimsun
ET - Aimsun Next Version 23.0.0
Y1  - 2023
Y2 - Accessed on: Month, Day, Year
CY  - Barcelona, Spain
PB  - Aimsun
UR  - [In software]. Available: https://docs.aimsun.com/next/23.0.0/


Aimsun Next 20.0.5

TY  - COMP
T1  - Aimsun Next 20.0.5 User's Manual
A1  - Aimsun
ET - Aimsun Next Version 20.0.5
Y1  - 2021
Y2 - Accessed on: Month, Day, Year
CY  - Barcelona, Spain
PB  - Aimsun
UR  - [In software]. Available: qthelp://aimsun.com.aimsun.20.0/doc/UsersManual/Intro.html