In Part 1 of this series, Geline Canayon explained GIS (Geographic Information System) file preparation and basic importer settings. This is Part 2, where we will deal with network importer settings.
In the Network Importer window, set all the parameters that affect the conversion of the polylines in the GIS file into sections, turns, centroids and connectors. The first tab, Sections, defines how the attributes of the polylines should be interpreted when creating the road sections.
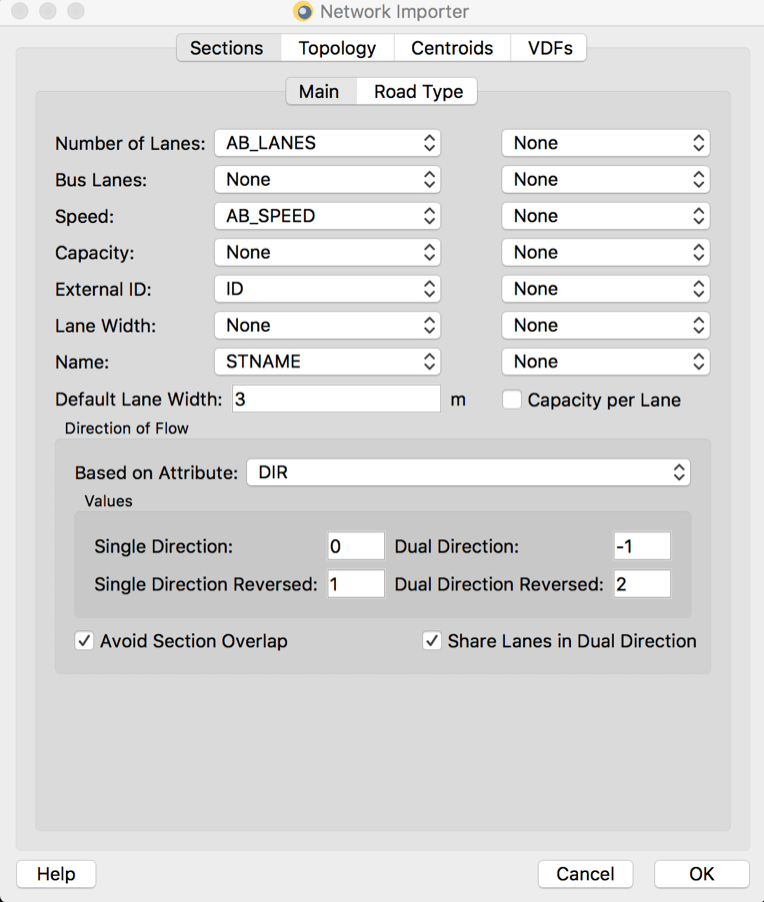
Figure 1: Network Importer – Sections – Main
Under the Main tab (Figure 1), the first aspect to define is whether bidirectional roads are coded as a single polyline or one polyline per direction. If you want a single polyline, go to “Direction of Flow” and choose which attribute tells whether a polyline represents a unidirectional or bidirectional road (“Based on Attribute”), and the value that represents a one-way road oriented as the polyline (“Single Direction”), a one-way road oriented in the opposite direction of the polyline (“Single Direction Reversed”), or a two-way road represented with a single polyline (“Dual Direction”) . If the polylines for the two directions overlap, don’t forget to check “Avoid Section Overlap” so that the imported sections are offset to a side of the centerline represented by the polyline. The Rule of the Road (set in Preferences) determines which section will be translated to the right or left of the centerline.
In cases where bidirectional roads are coded with two polylines (one per direction) go to “Direction of Flow” to select which attribute tells whether the direction is the same or the opposite of the polyline (“Based on Attribute”), and the value that represents a one-way road oriented as the polyline (“Single Direction”), a one-way road oriented in the opposite direction of the polyline (“Single Direction Reversed”); since no dual direction links exist in this case, put the unused values under “Dual Direction” and “Dual Direction Reversed” (e.g. 2 and 3 if the GIS file only contains 0 and 1 for the direction attribute).
In the upper part of the dialogue, set which attributes provide the basic parameters of the section, such as the number of lanes, the lane width, the speed limit, etc. If there are bidirectional roads coded as a single polyline, select two different attributes, one for each direction. The first column is for the forward direction and the second column is for the reverse direction. Otherwise, only the section with attributes will be imported, resulting in an incomplete network. If the GIS file doesn’t contain an attribute that provides one of the parameters, just leave “None” in both columns, and the importer will read the parameter from the road type. If the capacity attribute provides a capacity per lane instead of the total capacity of the link, check “Capacity per Lane”. If the number of lanes attribute for a bidirectional link represents the sum of all lanes in both directions, check “Share Lanes in Dual Direction”.
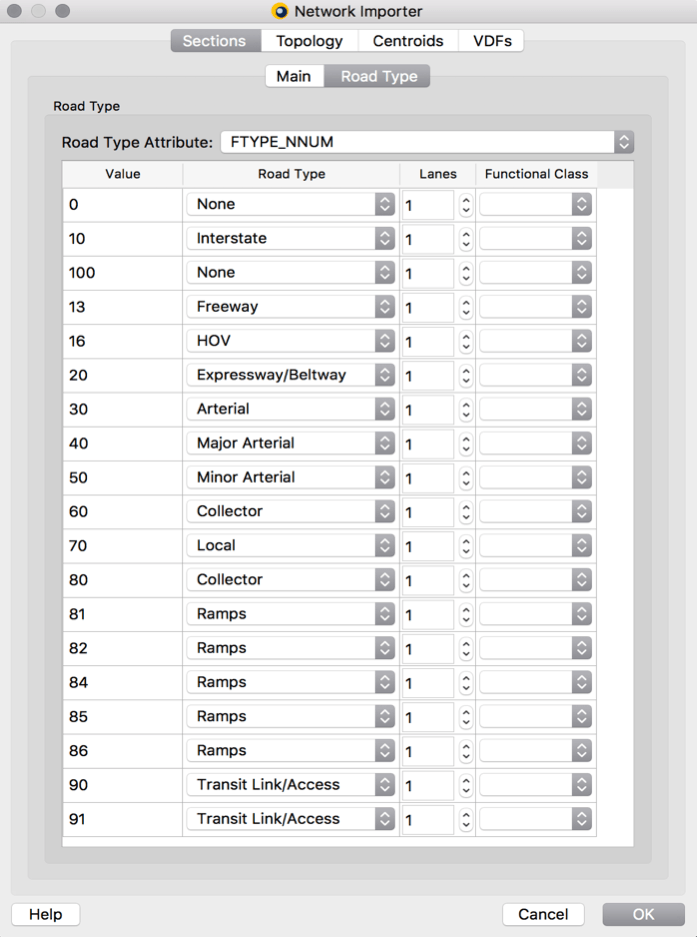
Figure 2: Network Importer > Sections > Road Type
Under the Road Type tab (Figure 2), select which attribute in the GIS file provides the road type of the link, and set the correspondence between the different values used under this attribute and the road types created in Aimsun Next prior to starting the import. If no road types are indicated, the current active road type will be applied to all the imported sections.
The “Lanes” column will be referred to if no attribute is selected for Number of Lanes in the Main tab. This field can also be used to prevent certain road types from being imported by selecting “Don’t Import”. In the US, Functional Class pertains to the service that the road is intended to provide.
Aimsun Next uses this information to hide low functional class sections when zooming out and add more details as you zoom in.
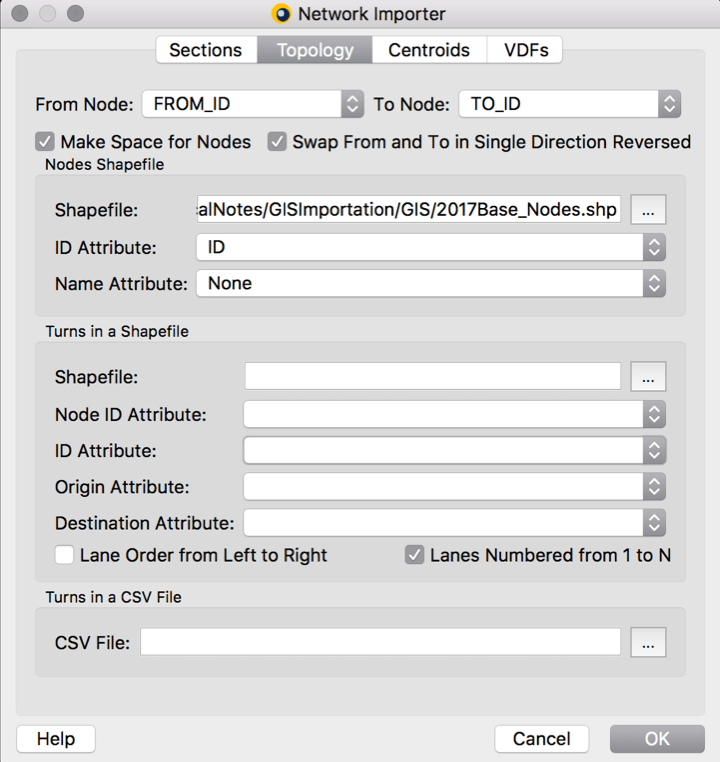
Figure 3: Network Importer > Topology
The Topology tab (Figure 3) contains critical information that determines the integrity of the network geometry. You can automatically create Nodes based on the attributes defined for From Node and To Node. These attributes must be available in the GIS file that you are importing (note that other software packages require an extra step to save these attributes before exporting the GIS).
Optionally, an additional GIS file with node information can be provided. However, it will only be used to import node attributes, and it will not affect the geometry of the imported network.
Activating Make Space for Nodes draws the sections with spaces where nodes should be. The Swap From and To in Single Direction Reversed will switch the origin and destination nodes for sections that are in the reversed direction. These two settings are essential in making sure that sections and nodes are imported accurately so that turns are generated accordingly.
Turns are automatically made between all the incoming sections and all the outgoing sections in the node (except U-turns) and the lanes used are automatically assigned. Turns are classified based on the angle between the sections. The importer also identifies whether only some or all the lanes are included in the turn, depending on the number of lanes and the other turning movements that start from the section. For example, in a left turn, maybe only the leftmost lane will be included in the left-turning movement while the rest of the lanes will be for the through and right-turning movement.
Alternatively, you can use a shapefile containing the turn and lane assignments. The file can be in a shapefile format or a .csv file. However, we recommend reviewing the network after the import is completed to ensure that they reflect reality.

Figure 4: Network Importer > Centroids
If the GIS data contains centroid connectors in addition to the road network, the GIS Importer can automatically create centroids and connectors. Go to the Centroids tab (Figure 4), activate “Centroid Connections in Links” and choose under “Coding” whether connectors can be identified based on the value of an attribute or based on a range of node IDs. When using Attribute Value, select which attribute allows identifying connectors, and the value of this attribute for polylines that represent connectors. In some cases, it could be the same attribute used to set the road type.
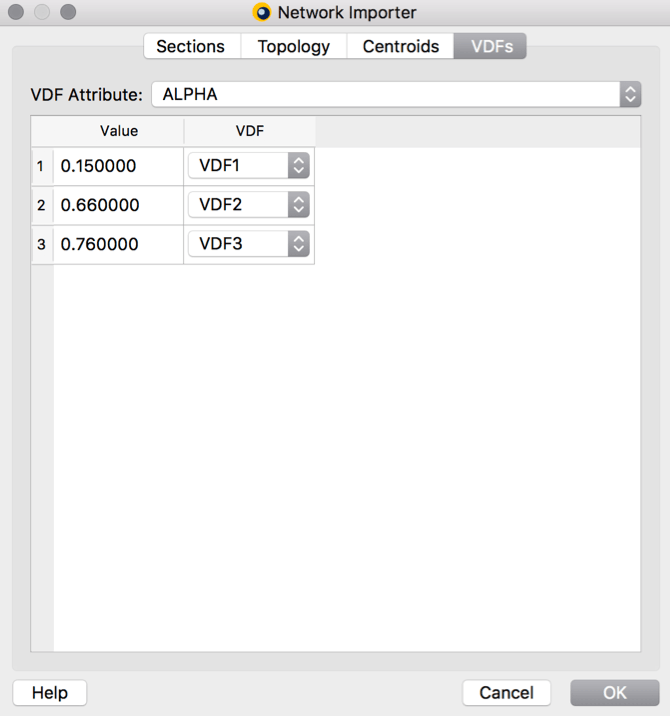
Figure 5: Network Importer > VDFs
To associate VDFs to the imported sections, go to the VDFs tab (Figure 5) and select which attribute should be used to match one of the VDFs that were previously created with the section being imported. If the GIS file doesn’t contain a specific attribute, sometimes you can use the road type or the functional class as a proxy, and in other cases, a factor in the function (e.g. alpha) is a good way to identify different VDFs.
Once you’ve created the network, you’ll need to verify that the importation was successful. Check first that the correct Coordinate System was set by going to Tools and opening the location in Google Maps. There are also some default View Modes on Aimsun Next such as PARAMETERS: Capacity Sections and PARAMETERS: Road Type that you can use to visually check any sudden drops in capacity or an incorrect road type.
